 Areca Docs
Deployment targets (Dokploy and Cloudflare)
Connect Dokploy or Cloudflare to Areca, store their credentials safely, and understand how each Go live build receives its snapshot and passes its health check.
When a site goes live, Areca asks the site's deployment provider to build the website and deploy it. The provider is Dokploy or Cloudflare. Areca does not build the site itself. It pins the content snapshot, starts the build, waits for the new deployment, and checks that it serves the release before marking the release live.
This page is for operators. It covers how to connect each provider to your Areca instance and how the deployment works underneath. To assign a deployment to a site and see its status in the admin interface, read deployments.
Areca has two deployment providers: Dokploy and Cloudflare. Each site uses one of them. Demo sites use neither. See the publishing pipeline for the full release flow.
Dokploy
What you need
- A Dokploy instance that the CMS can reach over HTTPS.
- A Git repository for each website that Dokploy can clone. A private GitHub repository works if Dokploy has a read-only deploy key for it.
- A CMS address that the Dokploy build host can reach.
localhostin the CMS settings means the build container, not your server, so use the public or private network address of the CMS. - The website's Dockerfile, which runs
areca pullduring the build. See go-live builds. Demo sites skip the deploy and the health check, so they need no health URL.
Connect a Dokploy application
Each client site needs one Dokploy application. You can create it by hand, or use the repository's dokploy:setup script, which does the same steps through the Dokploy API. The script is intended for onboarding and local testing.
Create the application. Add an application in Dokploy that builds from your website repository with the Dockerfile build type.
Turn off deploy on push. Only a Go live request should start a build. Leave automatic deployment off.
Publish a host port. Map a port on the Dokploy host to the port the website listens on, for example 3101 to 3000. Use host publishing mode.
Set the update order to stop-first. Dokploy's default start-first order cannot bind the same host port twice. Stop-first lets the new container take the port after the old one stops.
Save the credentials in Areca. Open the client under Agency, then Clients, then the client's Deployment section. Enter the Dokploy URL and API key, and select Save and verify. Areca lists the applications the key can see.
Assign the application to the site. In the site's Deployment settings, choose the application from the list (or enter its ID), enter the health check URL, and set the site to production.
Saving or removing Dokploy credentials requires a fresh two-factor code. See two-factor authentication and step-up.
Credentials and encryption
Each client has its own Dokploy URL and API key. Areca stores the API key encrypted in the database, using AES-256-GCM with the organization as part of the encryption context. After you save a key, the admin interface shows only its status. The key is never displayed again.
The encryption key comes from DOKPLOY_CREDENTIALS_ENCRYPTION_KEY. It must be a base64-encoded 32-byte value, and the CMS will not start without it. Generate one with:
openssl rand -base64 32Back up the key with the database
There is no re-encryption tool. If you lose DOKPLOY_CREDENTIALS_ENCRYPTION_KEY, or change it, every saved Dokploy key becomes unreadable, and each client's key must be entered again. Keep the key with your database backups, and never change it during an upgrade or a restore. The key must also be the same on every CMS instance that shares the database.
To rotate a Dokploy API key, create a new key in Dokploy, save it for the client in Areca, select Save and verify, and then revoke the old key in Dokploy.
The legacy process-wide DOKPLOY_URL and DOKPLOY_API_KEY pair is for local development only. It is used only when DOKPLOY_DEV_FALLBACK_ENABLED=true in a non-production environment, and production ignores it.
How the snapshot reaches the build
Every Go live request creates a publication with an immutable snapshot. Before it asks Dokploy to deploy, Areca writes the publication ID as ARECA_SNAPSHOT_ID. Where it writes it depends on the application's build type, because only Dockerfile builds read Dokploy's build arguments:
- Dockerfile: Areca writes it into the build arguments.
- Railpack, Nixpacks and buildpacks: Areca writes it into the application's environment variables, which Dokploy passes to these builders. The variable is also present in the running container.
- Unknown build type: Areca writes it into both.
Areca overwrites the value on every Go live, so do not set ARECA_SNAPSHOT_ID yourself. For a Dockerfile build, the application's build settings are:
ARECA_SNAPSHOT_IDis a Docker build argument, set to the publication ID for the release being built.ARECA_CMS_URLis also a build argument. It is the address the build uses to reach the CMS.ARECA_SITE_TOKENis passed as a BuildKit secret, not as a build argument or an image environment variable. The Dockerfile mounts it only for the step that pulls content, so it is not stored in an image layer.
The Dockerfile must declare ARG ARECA_SNAPSHOT_ID immediately before the step that runs areca pull, after the SDK is built. A Docker build caches each step, and changing the argument invalidates only the layers after it. If the argument is declared too early, Docker reuses the cached content pull from an earlier release, and the new container serves old content. The health check then fails, and the release is not marked live.
For Railpack, Nixpacks and buildpack builds, put ARECA_CMS_URL and ARECA_SITE_TOKEN in the application's environment variables. These builders ignore build arguments and build secrets. Unlike a BuildKit secret, the token is then also available in the running container.
Areca also tags each Dokploy deployment with areca:<jobId> as its title, and writes the publication ID and snapshot hash into its description. You need these values to find a deployment when you reconcile an uncertain release. Applications built from a Git provider do not keep these values: Dokploy stores the commit message and Commit: <sha> instead, so Areca falls back to the single deployment created after the dispatch.
Cloudflare
Cloudflare can host a site in two ways. Areca supports Cloudflare Pages projects and Workers with Workers Builds. Both are built by Cloudflare from a build trigger, and Areca starts the build for each release.
What you need for Cloudflare
- A Cloudflare account that holds the client's Pages projects or Workers.
- For each Pages project, a connection to a GitHub or GitLab repository. Direct-upload projects cannot be rebuilt, so Areca cannot use them.
- For each Worker, Workers Builds connected to the repository, with a build trigger for the production branch.
- A CMS address that the Cloudflare build can reach. As with Dokploy,
localhostmeans the build machine, not your server. - A build command that runs
areca pullbefore it builds the site. No Dockerfile is needed.
Create the API token
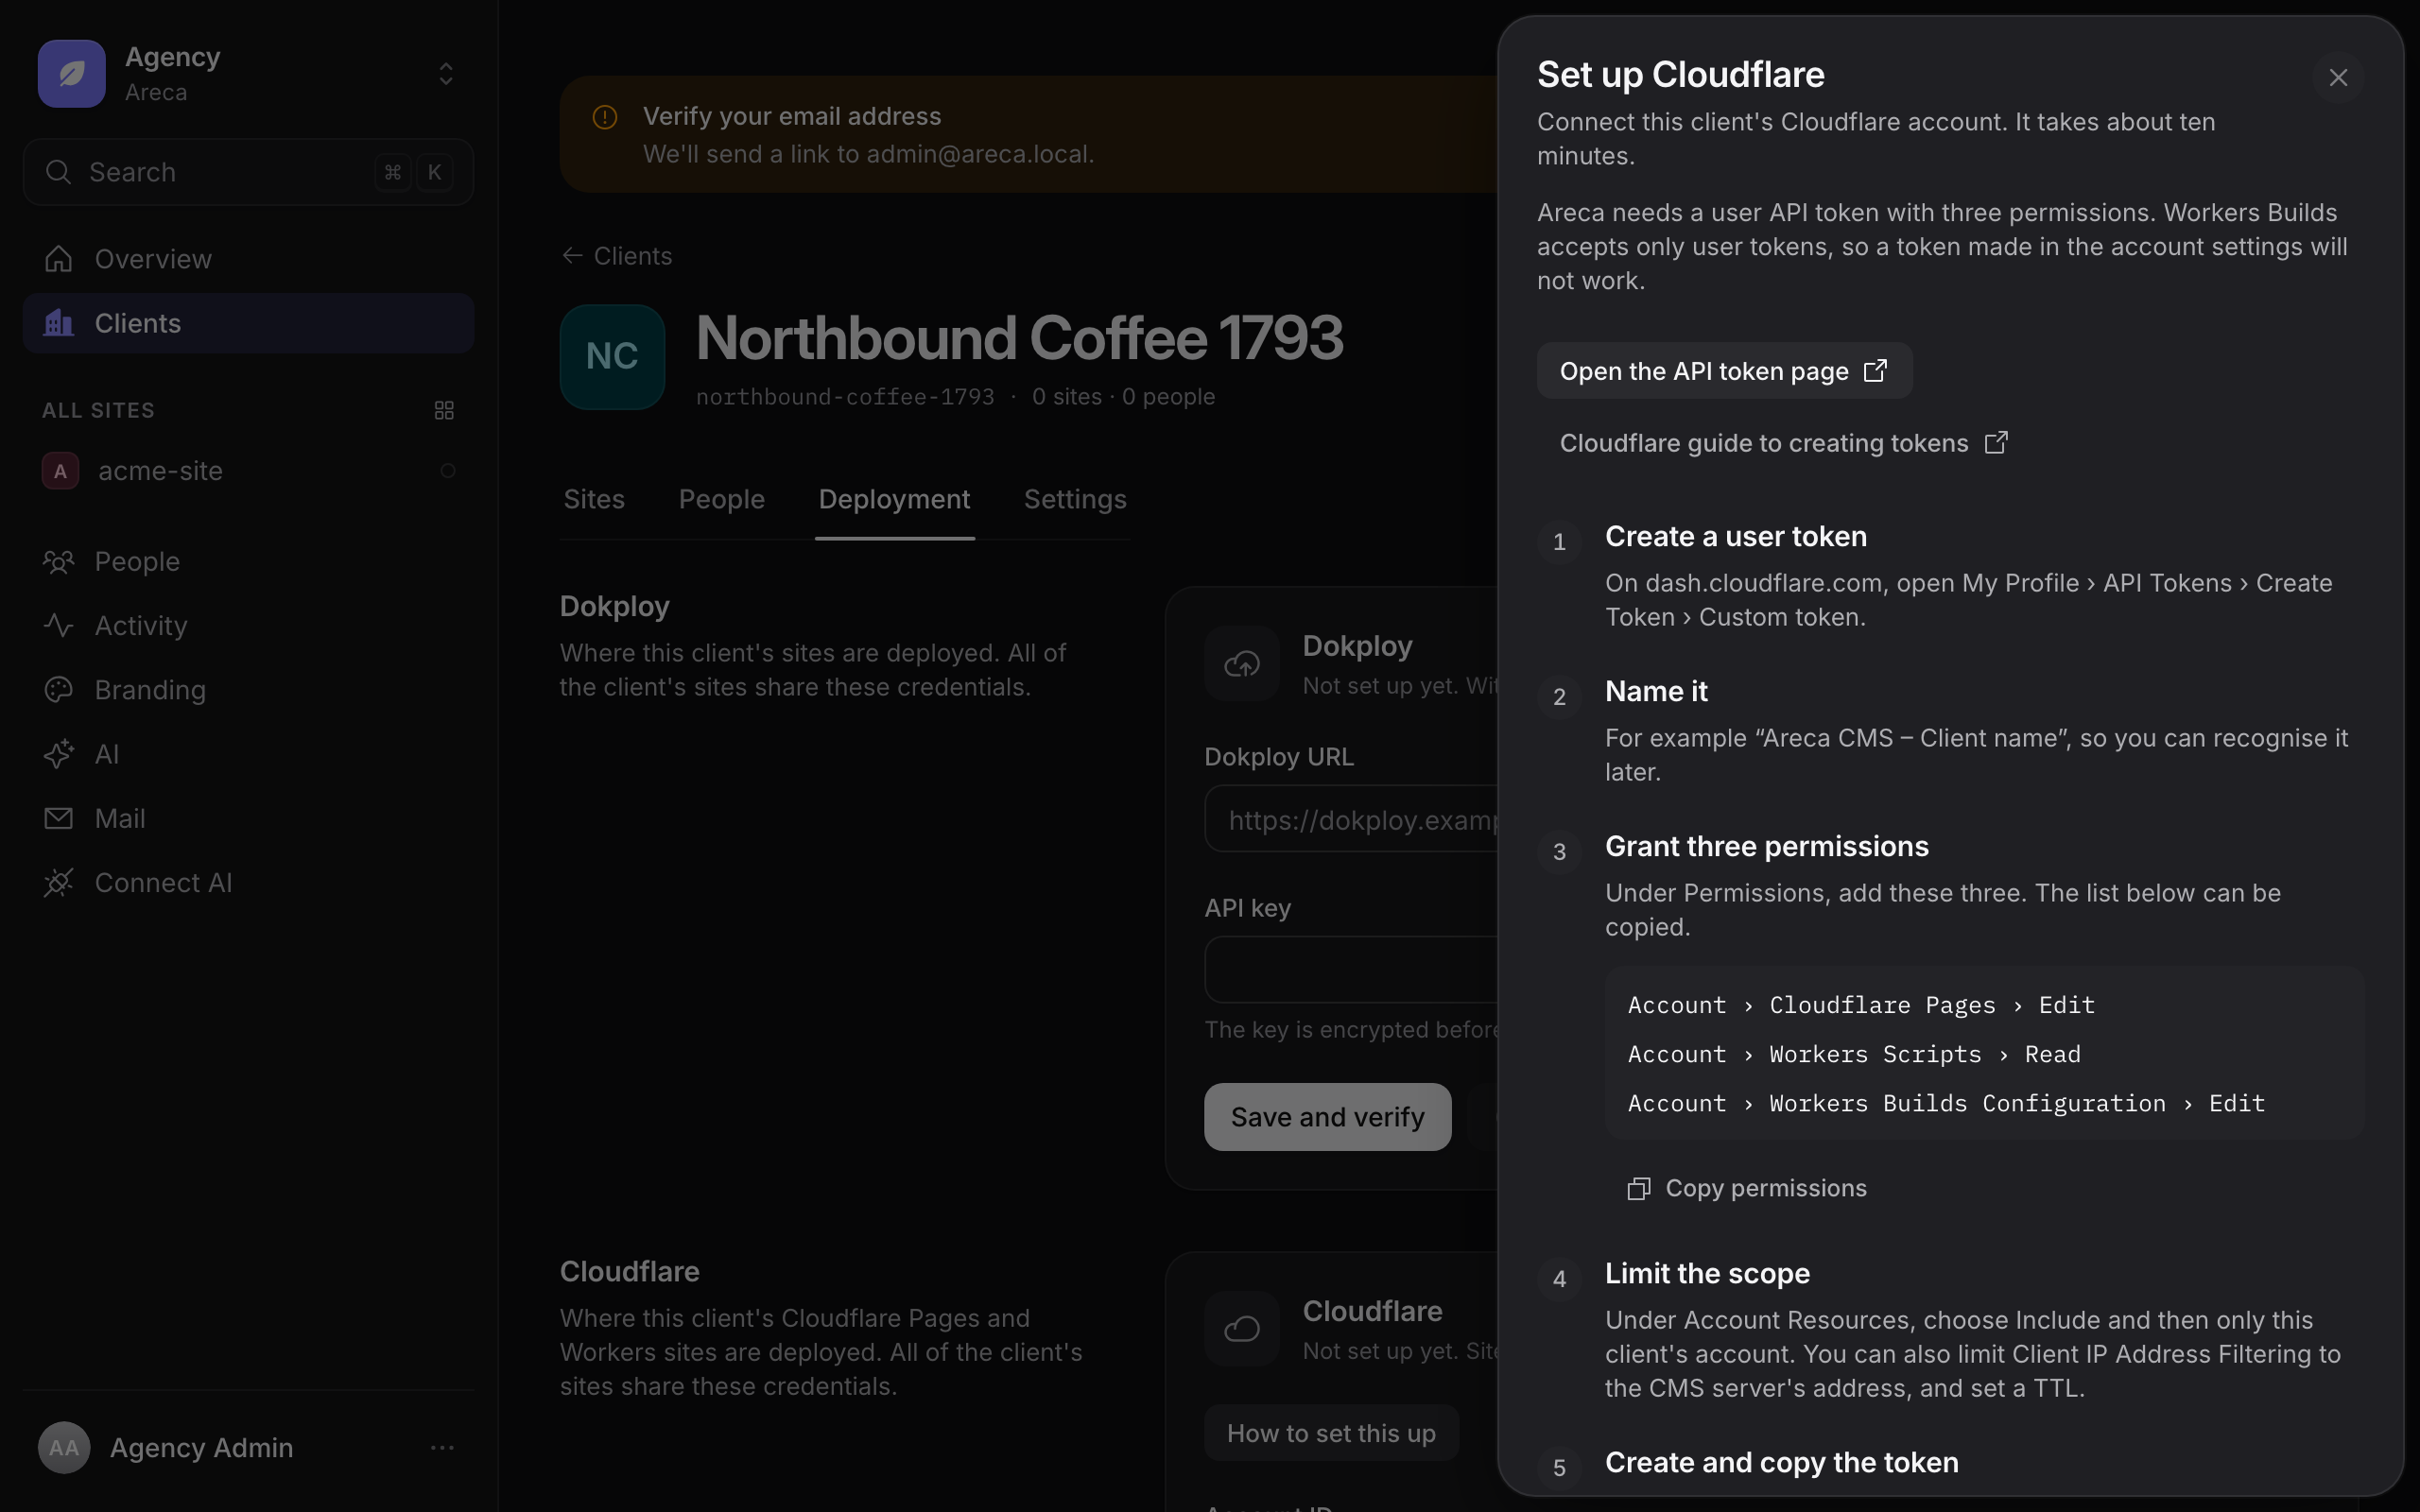
Areca uses a Cloudflare API token for each client. The in-app guide, opened with How to set this up on the Cloudflare card, has the same steps.
Create a user token. On dash.cloudflare.com, open My Profile › API Tokens, select Create Token, then Custom token. Use a user token. A token made in the account settings does not work, because the Workers Builds API accepts only user tokens. New tokens start with cfut_.
Name the token. For example, Areca CMS – Client name.
Add the three permissions. Add exactly these permissions. Cloudflare's API reference calls the last group "Workers CI".
| Permission | What Areca uses it for |
|---|---|
Account › Cloudflare Pages › Edit | Lists Pages projects, sets the production variable and starts production deployments. |
Account › Workers Scripts › Read | Lists Workers. |
Account › Workers Builds Configuration › Edit | Reads build triggers, sets the build variable and starts builds. |
Limit the account. Under Account Resources, choose Include, then select only this client's account. You can also limit Client IP Address Filtering to the CMS server's address, and set a TTL.
Create and copy the token. Cloudflare shows the token once. Copy it now.
Find the Account ID in the right sidebar of the Workers & Pages overview, or in the dashboard address dash.cloudflare.com/<account-id>. It is 32 hexadecimal characters.
Save the token in Areca under Agency › Clients › [client] › Deployment, in the Cloudflare card. Enter the Account ID and the API token, then select Save and verify. Areca runs the checks described below before it stores anything.
Prepare each project
Set up each project before you choose it for a site. Areca lists a project that cannot be built, but disables it and shows the reason.
- Pages. The project must be connected to GitHub or GitLab. A direct-upload project is shown disabled with No git connection.
- Workers. Connect Workers Builds in Cloudflare (Worker › Settings › Builds › Connect), with a trigger for the production branch. The trigger must deploy with
wrangler deploy. A trigger that runswrangler versions uploadonly uploads a preview, so a Worker whose triggers all do that is shown disabled with No production build trigger. A Worker without any trigger is shown disabled with Workers Builds not connected.
Set the build variables
Set these two variables on each project. Areca does not set them.
| Variable | Value |
|---|---|
ARECA_CMS_URL | The CMS address that the build can reach. |
ARECA_SITE_TOKEN | The site token. Store it as a secret, so Cloudflare encrypts it. |
- Pages: open the project, then Settings › Variables and Secrets, and add them to the production environment.
- Workers: open the Worker, then Settings › Builds › Variables and secrets. Add them as build variables, not as runtime variables.
Set the project's build command so that it runs areca pull before the site is built, for example areca pull && <your build>, or add a prebuild script that does the same. See go-live builds.
Then, in each site's Settings › Deployment, choose Cloudflare and the project. See deployments.
Checks when you save
Save always verifies the token first. Cloudflare must report the token as active, or the save is refused and nothing is stored. The messages are:
The token is disabled in Cloudflare.The token has expired.Cloudflare did not accept this token.
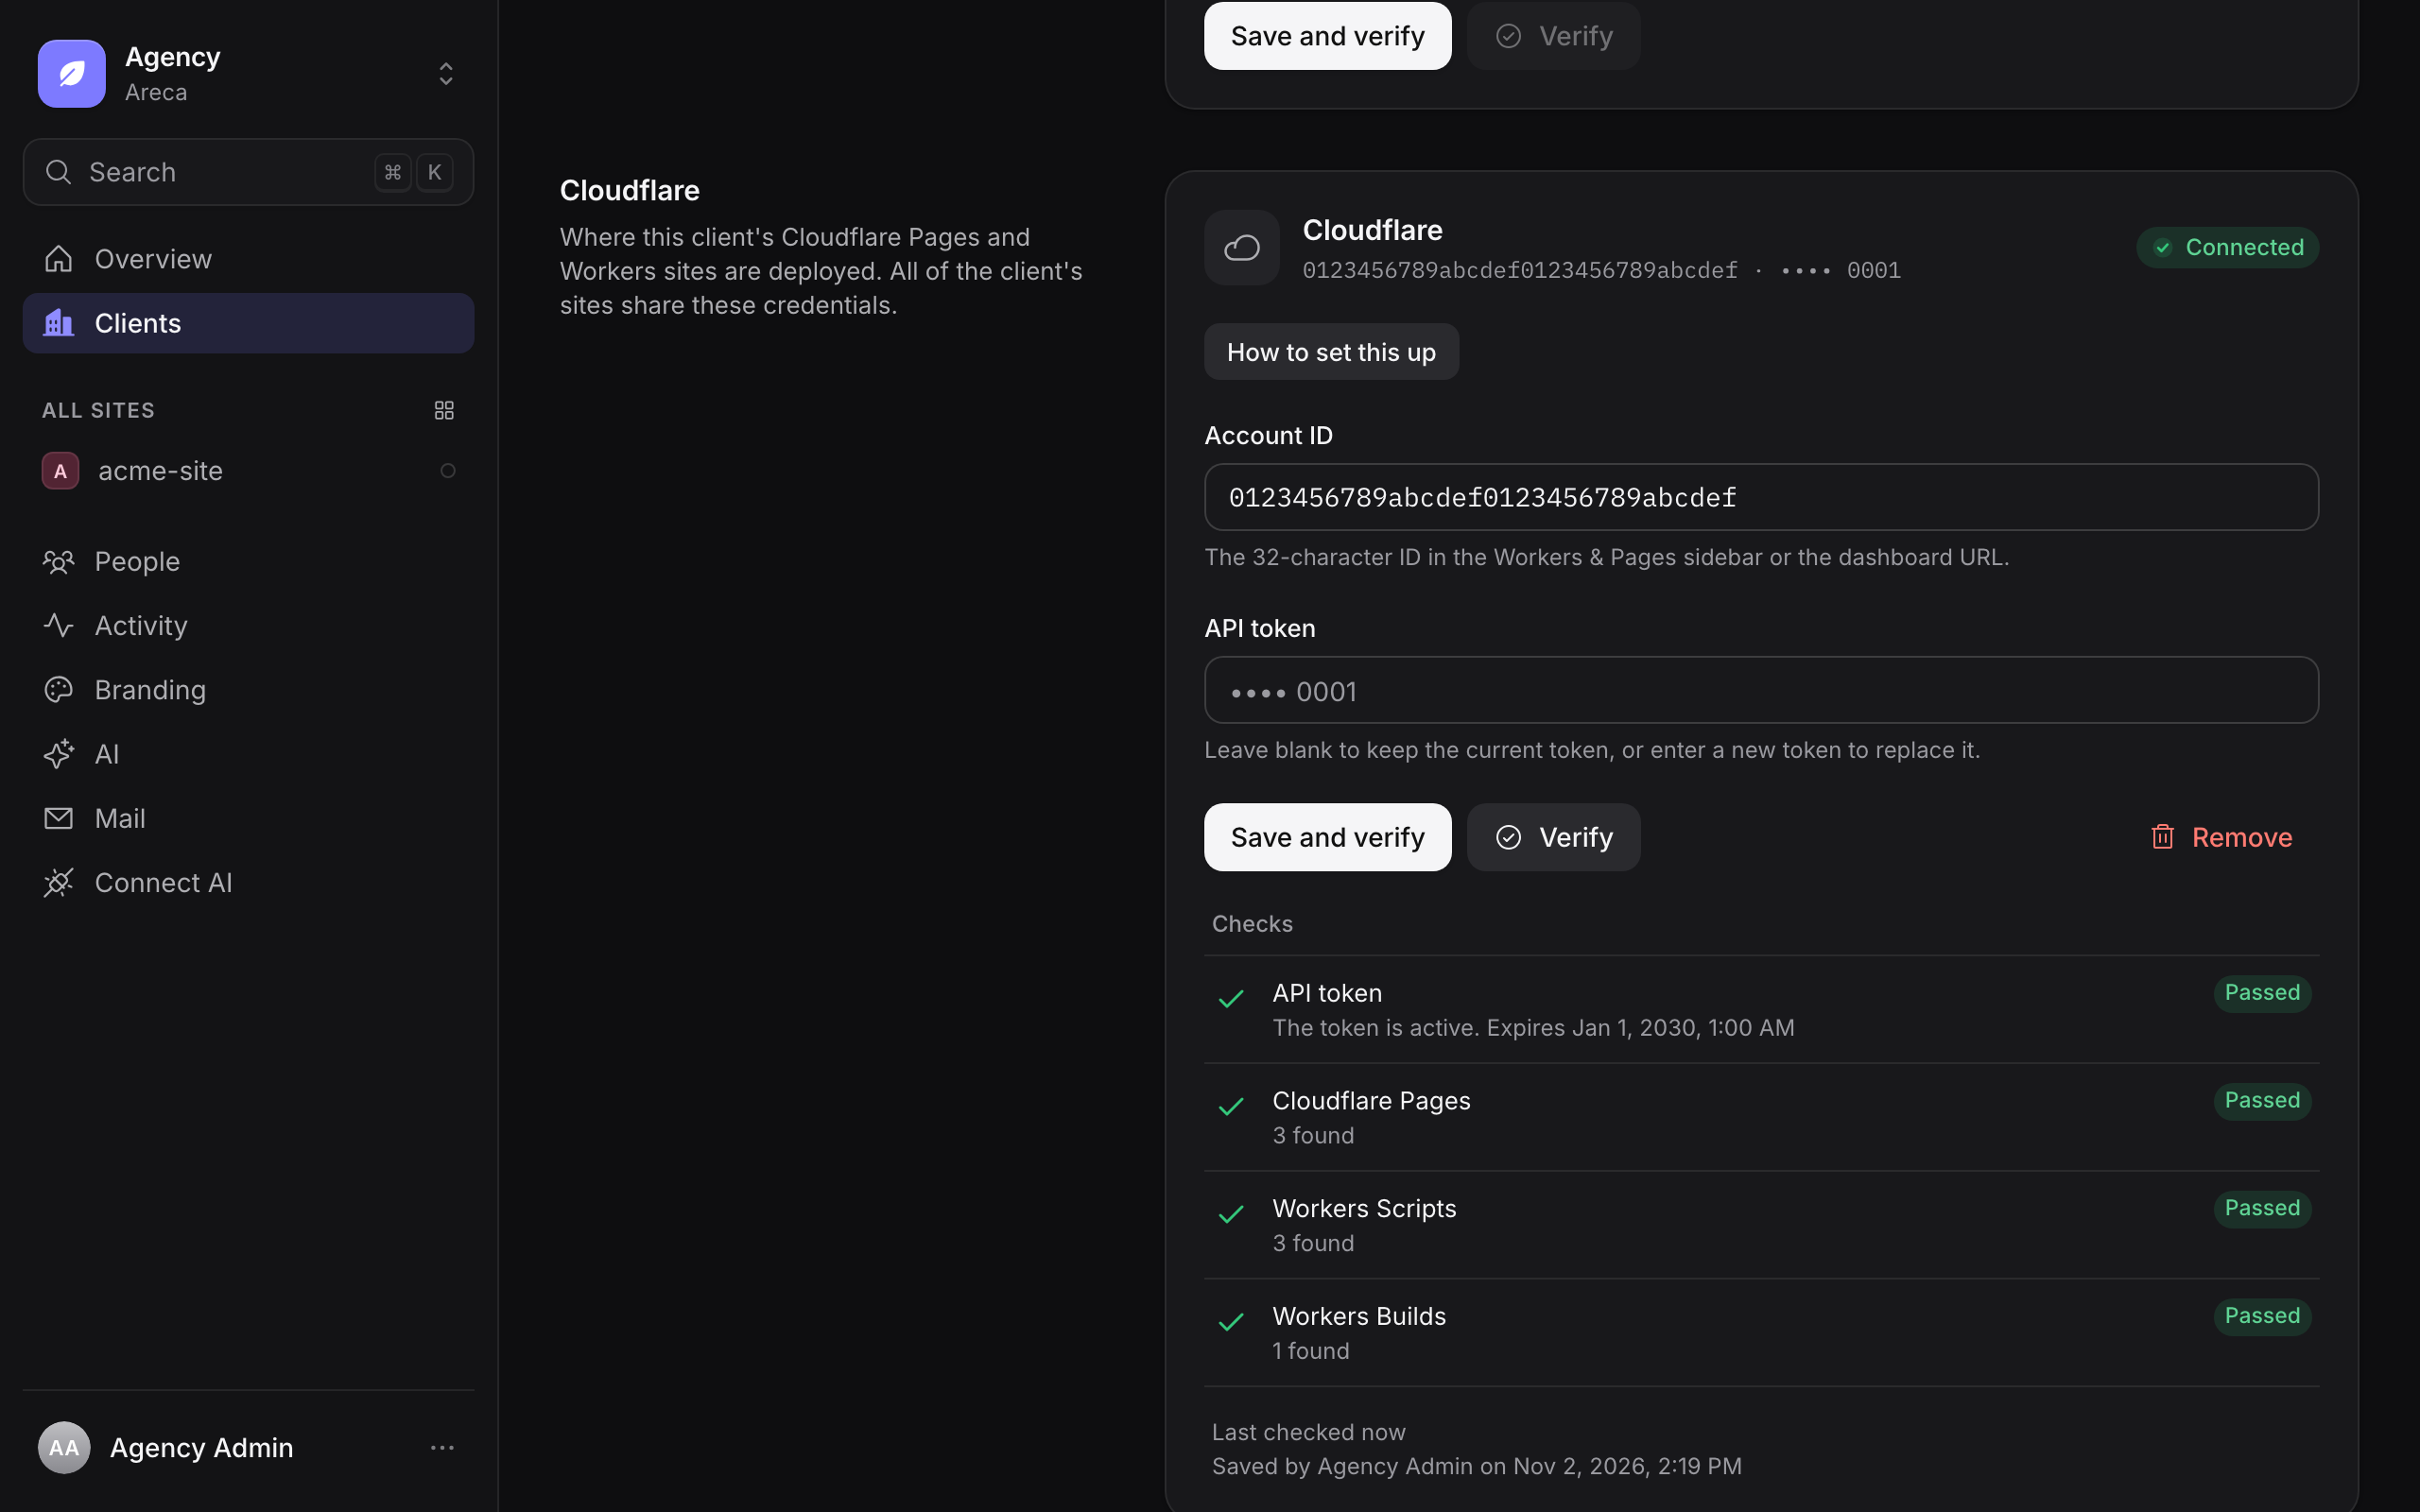
After that, Areca runs four checks and lists each one as Passed, Failed or Skipped under Checks:
| Check | Passes when |
|---|---|
| API token | The token is active. The expiry date is shown. |
| Cloudflare Pages | Areca can list the account's Pages projects. |
| Workers Scripts | Areca can list the account's Workers. |
| Workers Builds | Areca can list the build triggers of the first Worker. It is Skipped when the account has no Workers. |
A missing permission does not stop the save, but the token is then reported as Saved, but some checks failed. Add the missing permission in Cloudflare, then select Verify on the card. Verify reruns the checks for the saved token at any time.
After a successful save, the card shows Connected, the Account ID, the last four characters of the token (for example •••• 1234), who saved it and when, and when it was last checked. The token is never shown again. To change only the Account ID, leave the token field blank. To replace the token, enter a new one.
Save and verify and Remove need a fresh two-factor code, as the Dokploy card does. Verify does not. Only agency admins can see or change the card.
Cloudflare credentials and encryption
Areca encrypts each client's Cloudflare token with AES-256-GCM, bound to that client, in the same way as Dokploy keys. The encryption key comes from CLOUDFLARE_CREDENTIALS_ENCRYPTION_KEY. This variable is optional. Without it, the CMS still starts, but the Cloudflare card shows Encryption key not set, and saving is disabled. Generate a key with:
openssl rand -base64 32Back up the Cloudflare key with the database
The same rules apply as for DOKPLOY_CREDENTIALS_ENCRYPTION_KEY. There is no re-encryption tool. If you lose or change CLOUDFLARE_CREDENTIALS_ENCRYPTION_KEY, every saved Cloudflare token becomes unreadable, and each client's token must be entered again. The key must be the same on every CMS instance that shares the database. All-zero keys are refused.
The client export does not include Cloudflare tokens. After you import a client, enter its Cloudflare token again. See backup and recovery.
CLOUDFLARE_API_BASE_URL points Areca at a fake Cloudflare API for development and testing. Production ignores it, and always calls https://api.cloudflare.com/client/v4. For all Cloudflare variables, see configuration.
How the snapshot reaches a Cloudflare build
Before each deploy, Areca writes the build variable ARECA_SNAPSHOT_ID with the publication ID as its value:
- Pages: in the project's production environment variables.
- Workers: in the build variables of the trigger for the production branch.
The write merges with your other variables. areca pull reads ARECA_SNAPSHOT_ID and pulls exactly that release. If the write fails, the deploy is not sent. Do not set ARECA_SNAPSHOT_ID yourself.
The variable stays set after the release. A build that Cloudflare starts from a git push therefore pulls the same release, until the next go-live changes it.
Then Areca starts one build. For Pages, this is a production deployment of the production branch. For Workers, it is one build on the production trigger. The request is sent once and never retried, because Cloudflare does not deduplicate builds, so a retry would start a second one.
Areca checks the build every 5 seconds for up to 15 minutes. A Pages deployment is done when its deploy stage succeeds. A Worker build is done when it stops with the outcome success. Any other end is a failure. If the build fails, Areca copies the last 100 lines of the build log into the job log. When it starts the build, it logs a link to the deployment or build in the Cloudflare dashboard.
After that, the same health check as for Dokploy runs. See health checks.
Uncertain Cloudflare deployments
If the response to the build request is lost, Areca searches for up to 30 seconds for exactly one matching build that was created after the request:
- Pages: a production deployment started by the API (type
ad_hoc) on the production branch. - Workers: a build on the same trigger and branch, started by the API (trigger source
manual).
If exactly one build matches, Areca continues with it. Otherwise the release becomes uncertain, and Areca never redeploys it automatically. Follow the steps in uncertain deployments, but check the Cloudflare dashboard first. Open Workers & Pages › the project › Deployments, or the Worker › Builds. Cancel any build that is still running there before you select Release publishing block.
Remove Cloudflare credentials
Remove deletes the saved token and Account ID. It needs a fresh two-factor code, and it is blocked while a deployment is pending. The confirmation dialog says how many sites deploy with Cloudflare.
The sites keep their target. Their next go-live fails with Cloudflare credentials are not configured for this client, until you add the credentials again.
Cloudflare limits
Cloudflare allows 10 Workers Builds per minute for each Worker, and 100 per minute for each account. Cloudflare's own limits apply to every build that Areca starts, so avoid go-lives in quick succession for the same Worker.
Health checks
Production sites must set a health check URL. Areca polls it until it returns HTTP 200 with a JSON body whose publicationId matches the release being built. A plain 200 response is not enough, because the previous container could still be serving. Your website must return the publication ID from its health route. See go-live builds. Demo sites skip the deploy and the health check, so they need no health URL.
A typical health check URL for a host-published port is:
https://www.client-site.example/api/healthFor a Cloudflare project, Areca fills the health check URL in from the project's first custom domain, followed by /api/health. If the project has no custom domain, it uses <project>.pages.dev for a Pages project, or <worker>.<account-subdomain>.workers.dev for a Worker. You can edit it.
Areca follows up to four redirects, and checks the final response. If the check fails within two minutes, the release fails and the previous release stays live.
HTTPS and private addresses
Areca enforces these rules on every outbound connection to Dokploy and to health check URLs:
- The Dokploy API must use HTTPS. Plain HTTP is accepted only for
localhost, or whenDOKPLOY_ALLOW_INSECURE_HTTP=true. Redirects are rejected, and the API URL must not contain a user name or password. - Health checks must use HTTP or HTTPS. Areca refuses a health check URL that resolves to a private or reserved address, such as a loopback, link-local or RFC 1918 address. It connects to the address it checked, so a name cannot be changed between the check and the request.
- Local and LAN testing needs two switches. To test against a LAN address over HTTP, set
DOKPLOY_ALLOW_INSECURE_HTTP=trueandALLOW_PRIVATE_HEALTH_CHECKS=true.
Do not enable these on a public CMS
DOKPLOY_ALLOW_INSECURE_HTTP and ALLOW_PRIVATE_HEALTH_CHECKS weaken the protections above. Use them only on an isolated local or LAN instance, never on a CMS that clients or the internet can reach.
For the variables, see configuration.
Timeouts and retries
| Operation | Limit | On failure |
|---|---|---|
| Dokploy API request | 15 seconds | Counted as a failed attempt. |
| Cloudflare API request | 15 seconds | Counted as a failed attempt. |
| Dokploy read calls and identical environment writes | Up to 3 attempts, with a short backoff of about 100 ms and then 200 ms | Retried on network errors and on HTTP 408, 429, 500, 502, 503 and 504. Other HTTP errors are not retried. |
Cloudflare reads and the ARECA_SNAPSHOT_ID write | Up to 3 attempts, with a backoff of about 100 ms and then 200 ms | Retried on network errors, request timeouts, and HTTP 408, 429 and 5xx. |
| Deploy request (Dokploy or Cloudflare) | Sent once, never retried | If the response is lost or ambiguous, Areca searches the provider for the matching deployment or build for up to 30 seconds. |
| Status check while waiting for a build (Dokploy or Cloudflare) | Retried for about 30 seconds in total, with a backoff of 0.5, 1, 2, 4, 8 and 15 seconds | Retried on network errors, request timeouts, and HTTP 408, 429 and 5xx. If the checks still fail, or fail with another error, the release becomes uncertain. |
| Deployment completion | Checked every 5 seconds, for up to 15 minutes | The release fails if the provider reports an error. It becomes uncertain if the wait runs out. |
| Health check | Checked every 5 seconds, for up to 2 minutes | The release fails. |
| Build job lease | 60 seconds, renewed every 15 seconds | See the publishing pipeline. |
The deploy request is never retried automatically, because a retry could start a second build. If Areca cannot confirm whether the deploy request was accepted, the release becomes uncertain and waits for you to reconcile it. The publishing pipeline explains how.
Related
- Deployments: assigning a deployment to a site in the admin interface.
- Publishing pipeline: what happens after you press Go live.
- Go-live builds: the website side of a build, including
areca pull. - Configuration: every Dokploy, Cloudflare and health check variable.
- Secrets: how the Dokploy and Cloudflare keys and the encryption keys are protected.
Storage and email
Configure S3-compatible storage for uploads, serve assets through a CDN, and send email through SMTP, with provider settings and delivery checks.
Operations and monitoring
Health and readiness endpoints, Prometheus metrics and alerts, logs, worker shutdown, database timeouts and routine maintenance for Areca.