 Areca Docs
Deployments
Connect a client's Dokploy or Cloudflare account, choose a provider and Production or Demo mode for each site, set the project and health check URL, and test the connection.
When a release goes live, Areca can redeploy the website through a deployment target. A target is a Dokploy application or a Cloudflare Pages project or Worker. This page covers the admin side: connecting a client to a provider, and choosing how each of its sites publishes. For the operator's view of targets and health checks, see deployment targets.
You set this up in two places:
- The client has its own connection to Dokploy and to Cloudflare, shared by all of its sites. A client can have neither, one or both. You set them up under Agency › Clients › [client] › Deployment.
- Each site chooses a publishing mode, a provider and a project. You set these under Settings › Deployment for that site.
Only agency admins can change either place.
Choose a publishing mode
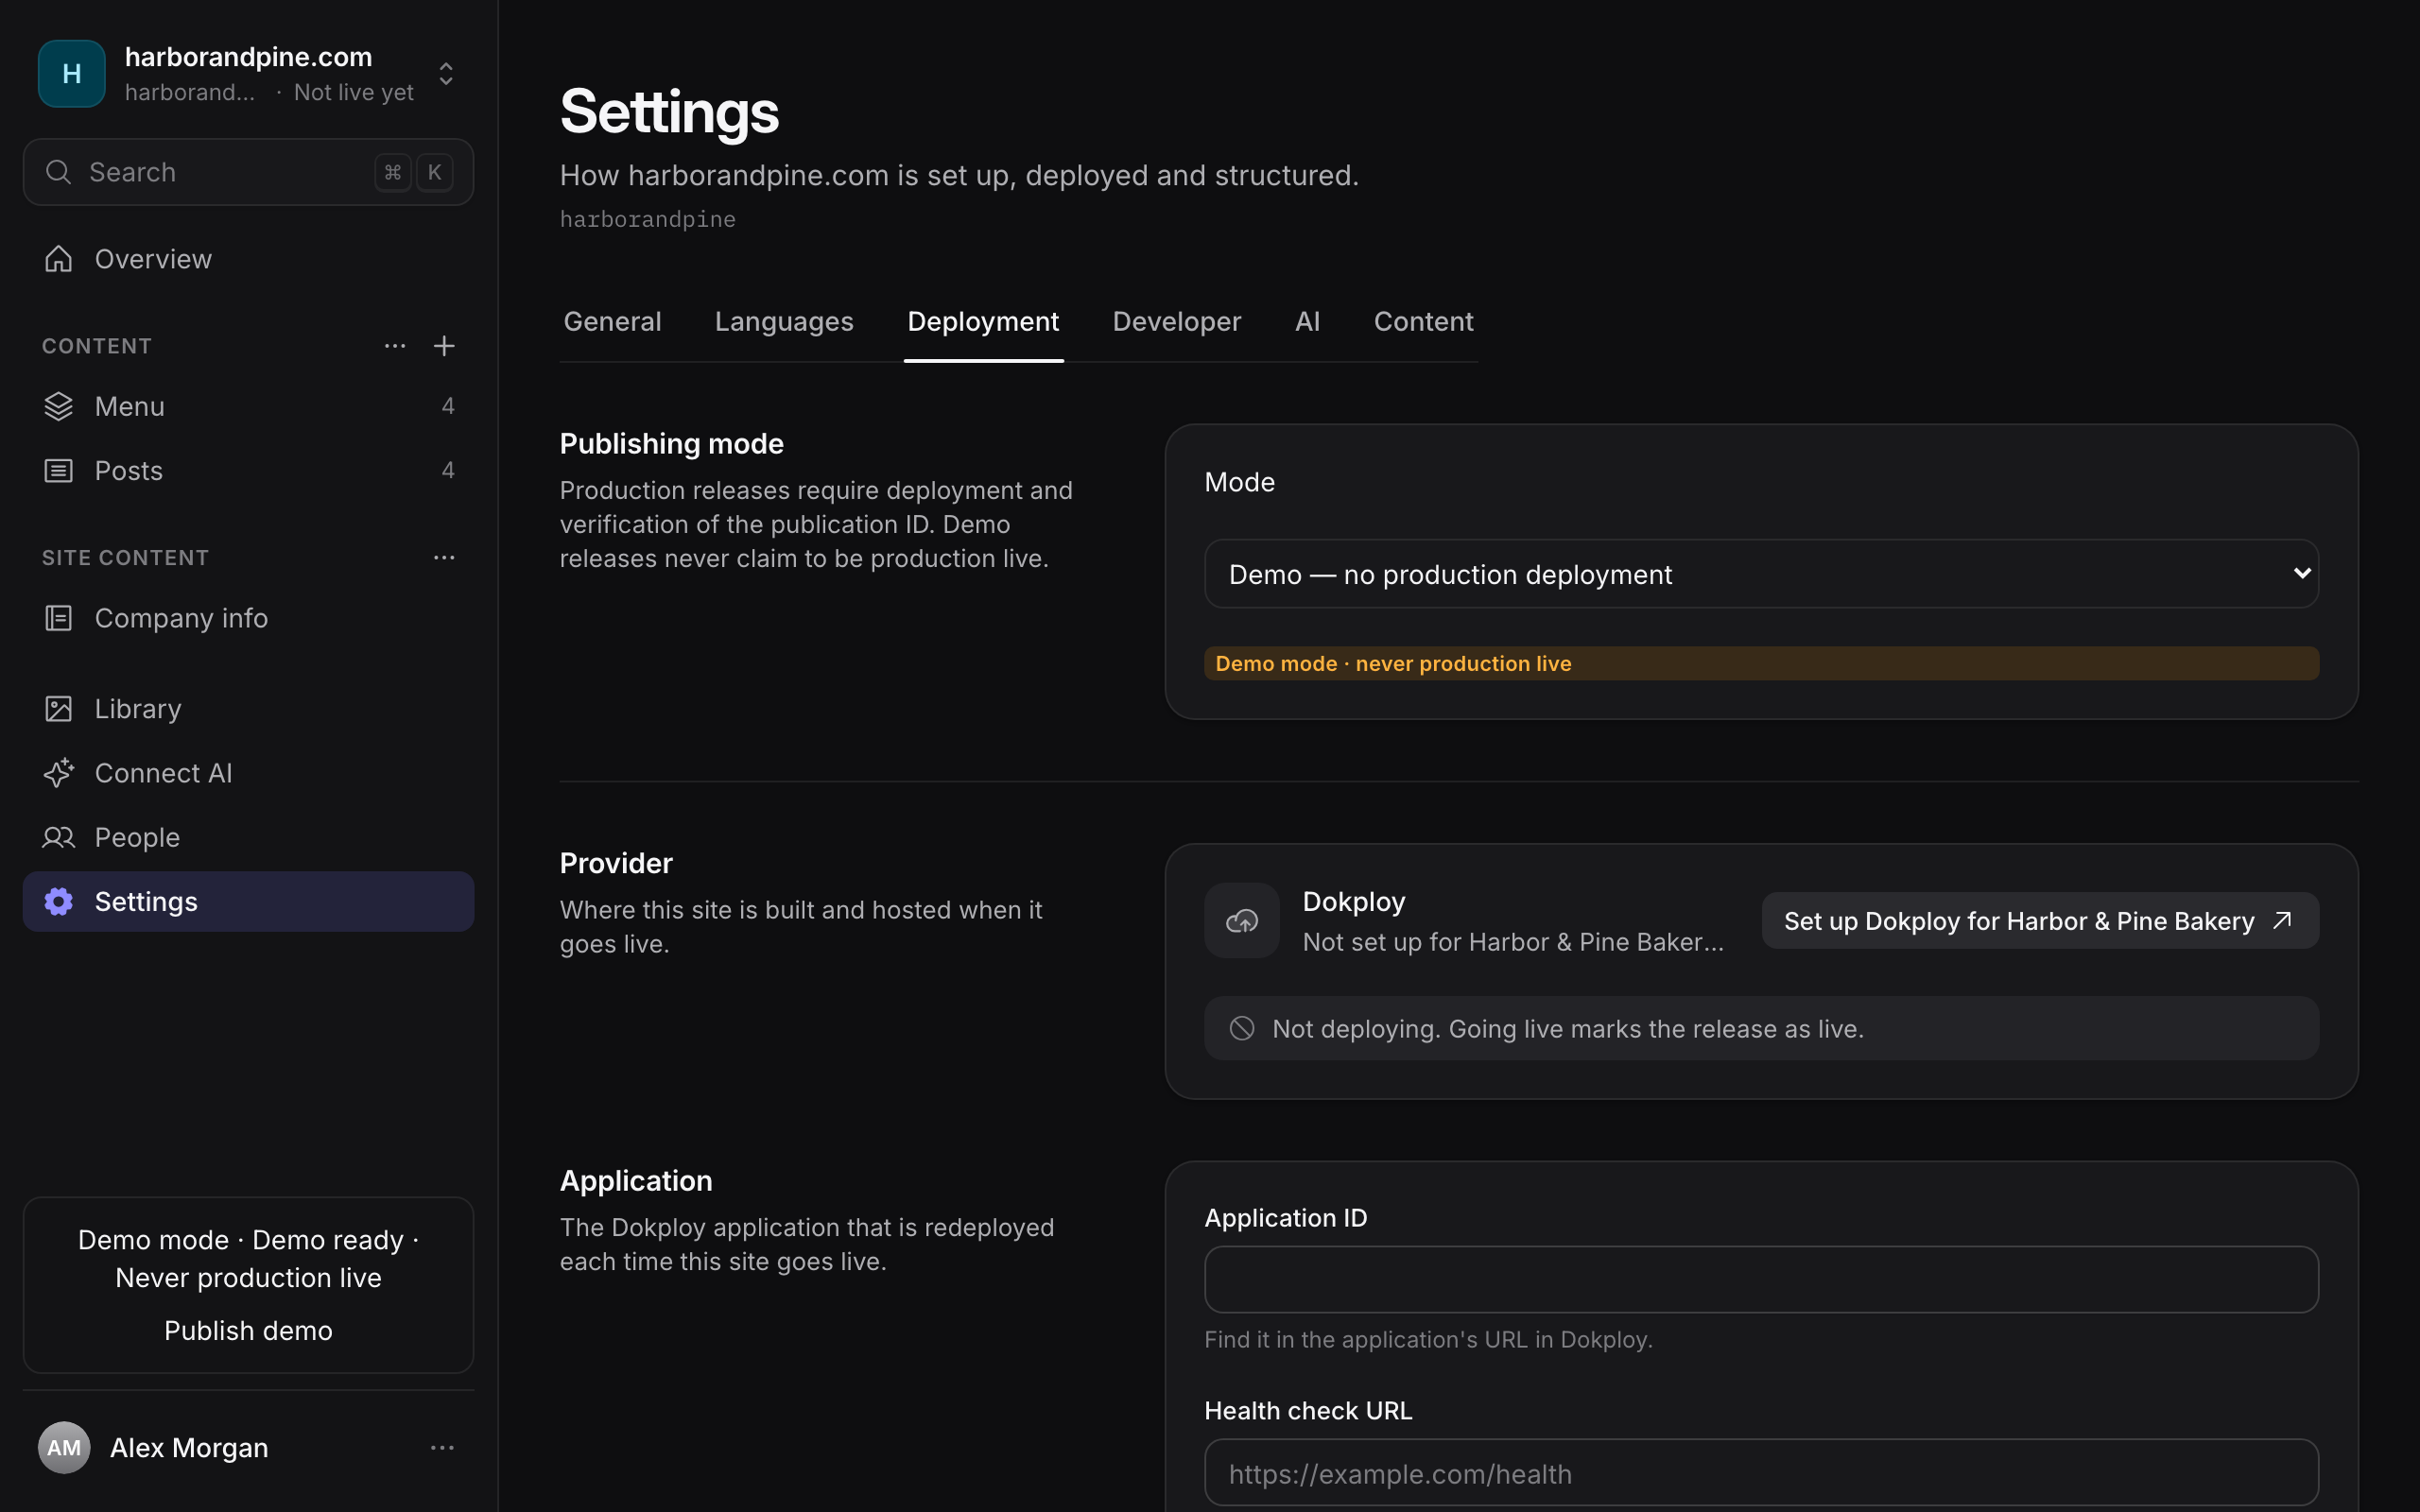
Each site has a Publishing mode, set on Settings › Deployment.
| Mode | What happens when a release goes live |
|---|---|
| Production | Areca builds the release, deploys it to the site's target (a Dokploy application or a Cloudflare project), and checks the health check URL. The release counts as live only after the check passes. |
| Demo (labelled "Demo — no production deployment") | Areca builds and records the release, but doesn't deploy it. Demo releases are labelled and never count as live in production. |
Use Demo for a site that isn't ready to be deployed, or for local work. Use Production for the site the public sees.
Connect the client to Dokploy
Open the client's Deployment tab. In the Agency workspace, open the client and select Deployment.
Enter the Dokploy URL. Use the address of your Dokploy dashboard, such as https://dokploy.example.com.
Enter the API key. Areca encrypts the key before storing it and never shows it again. To replace a saved key later, enter a new one. Leave the field blank to keep the current key.
Select Save and verify. Areca checks the credentials and lists the applications they can see. The Connected status appears when the connection works.
Test the connection
Use Verify to test the saved credentials again at any time, for example after you change something in Dokploy. If the test fails, Areca shows the reason next to the form, such as Couldn't connect followed by the error from Dokploy. Fix the URL or key, then verify again.
Remove credentials deletes the saved connection. Production sites of this client that deploy with Dokploy then fail to deploy until you add the credentials again.
Connect the client to Cloudflare
The Cloudflare card sits under the Dokploy card on the same tab. It needs a user API token and the client's Account ID. The token needs three permissions, and it must belong to a user, not to the account.
Open the Cloudflare card. Under Agency › Clients › [client] › Deployment, find the Cloudflare card. Select How to set this up for the guide, which lists the steps and has a Copy permissions button.
Enter the Account ID and the API token. The Account ID is 32 hexadecimal characters, from the Workers & Pages overview or the dashboard URL. The token is shown by Cloudflare only once.
Select Save and verify. Areca checks the token and the permissions before it stores anything. The card then shows Connected, the last four characters of the token, and the results of four checks: API token, Cloudflare Pages, Workers Scripts and Workers Builds.
If a check fails, Areca still saves the token and reports Saved, but some checks failed. Add the missing permission in Cloudflare, then select Verify. Remove deletes the saved token and Account ID. Sites that deploy with Cloudflare then fail their next go-live until you add the credentials again.
The full token steps, the checks and the encryption key are in deployment targets.
Choose a provider for a site
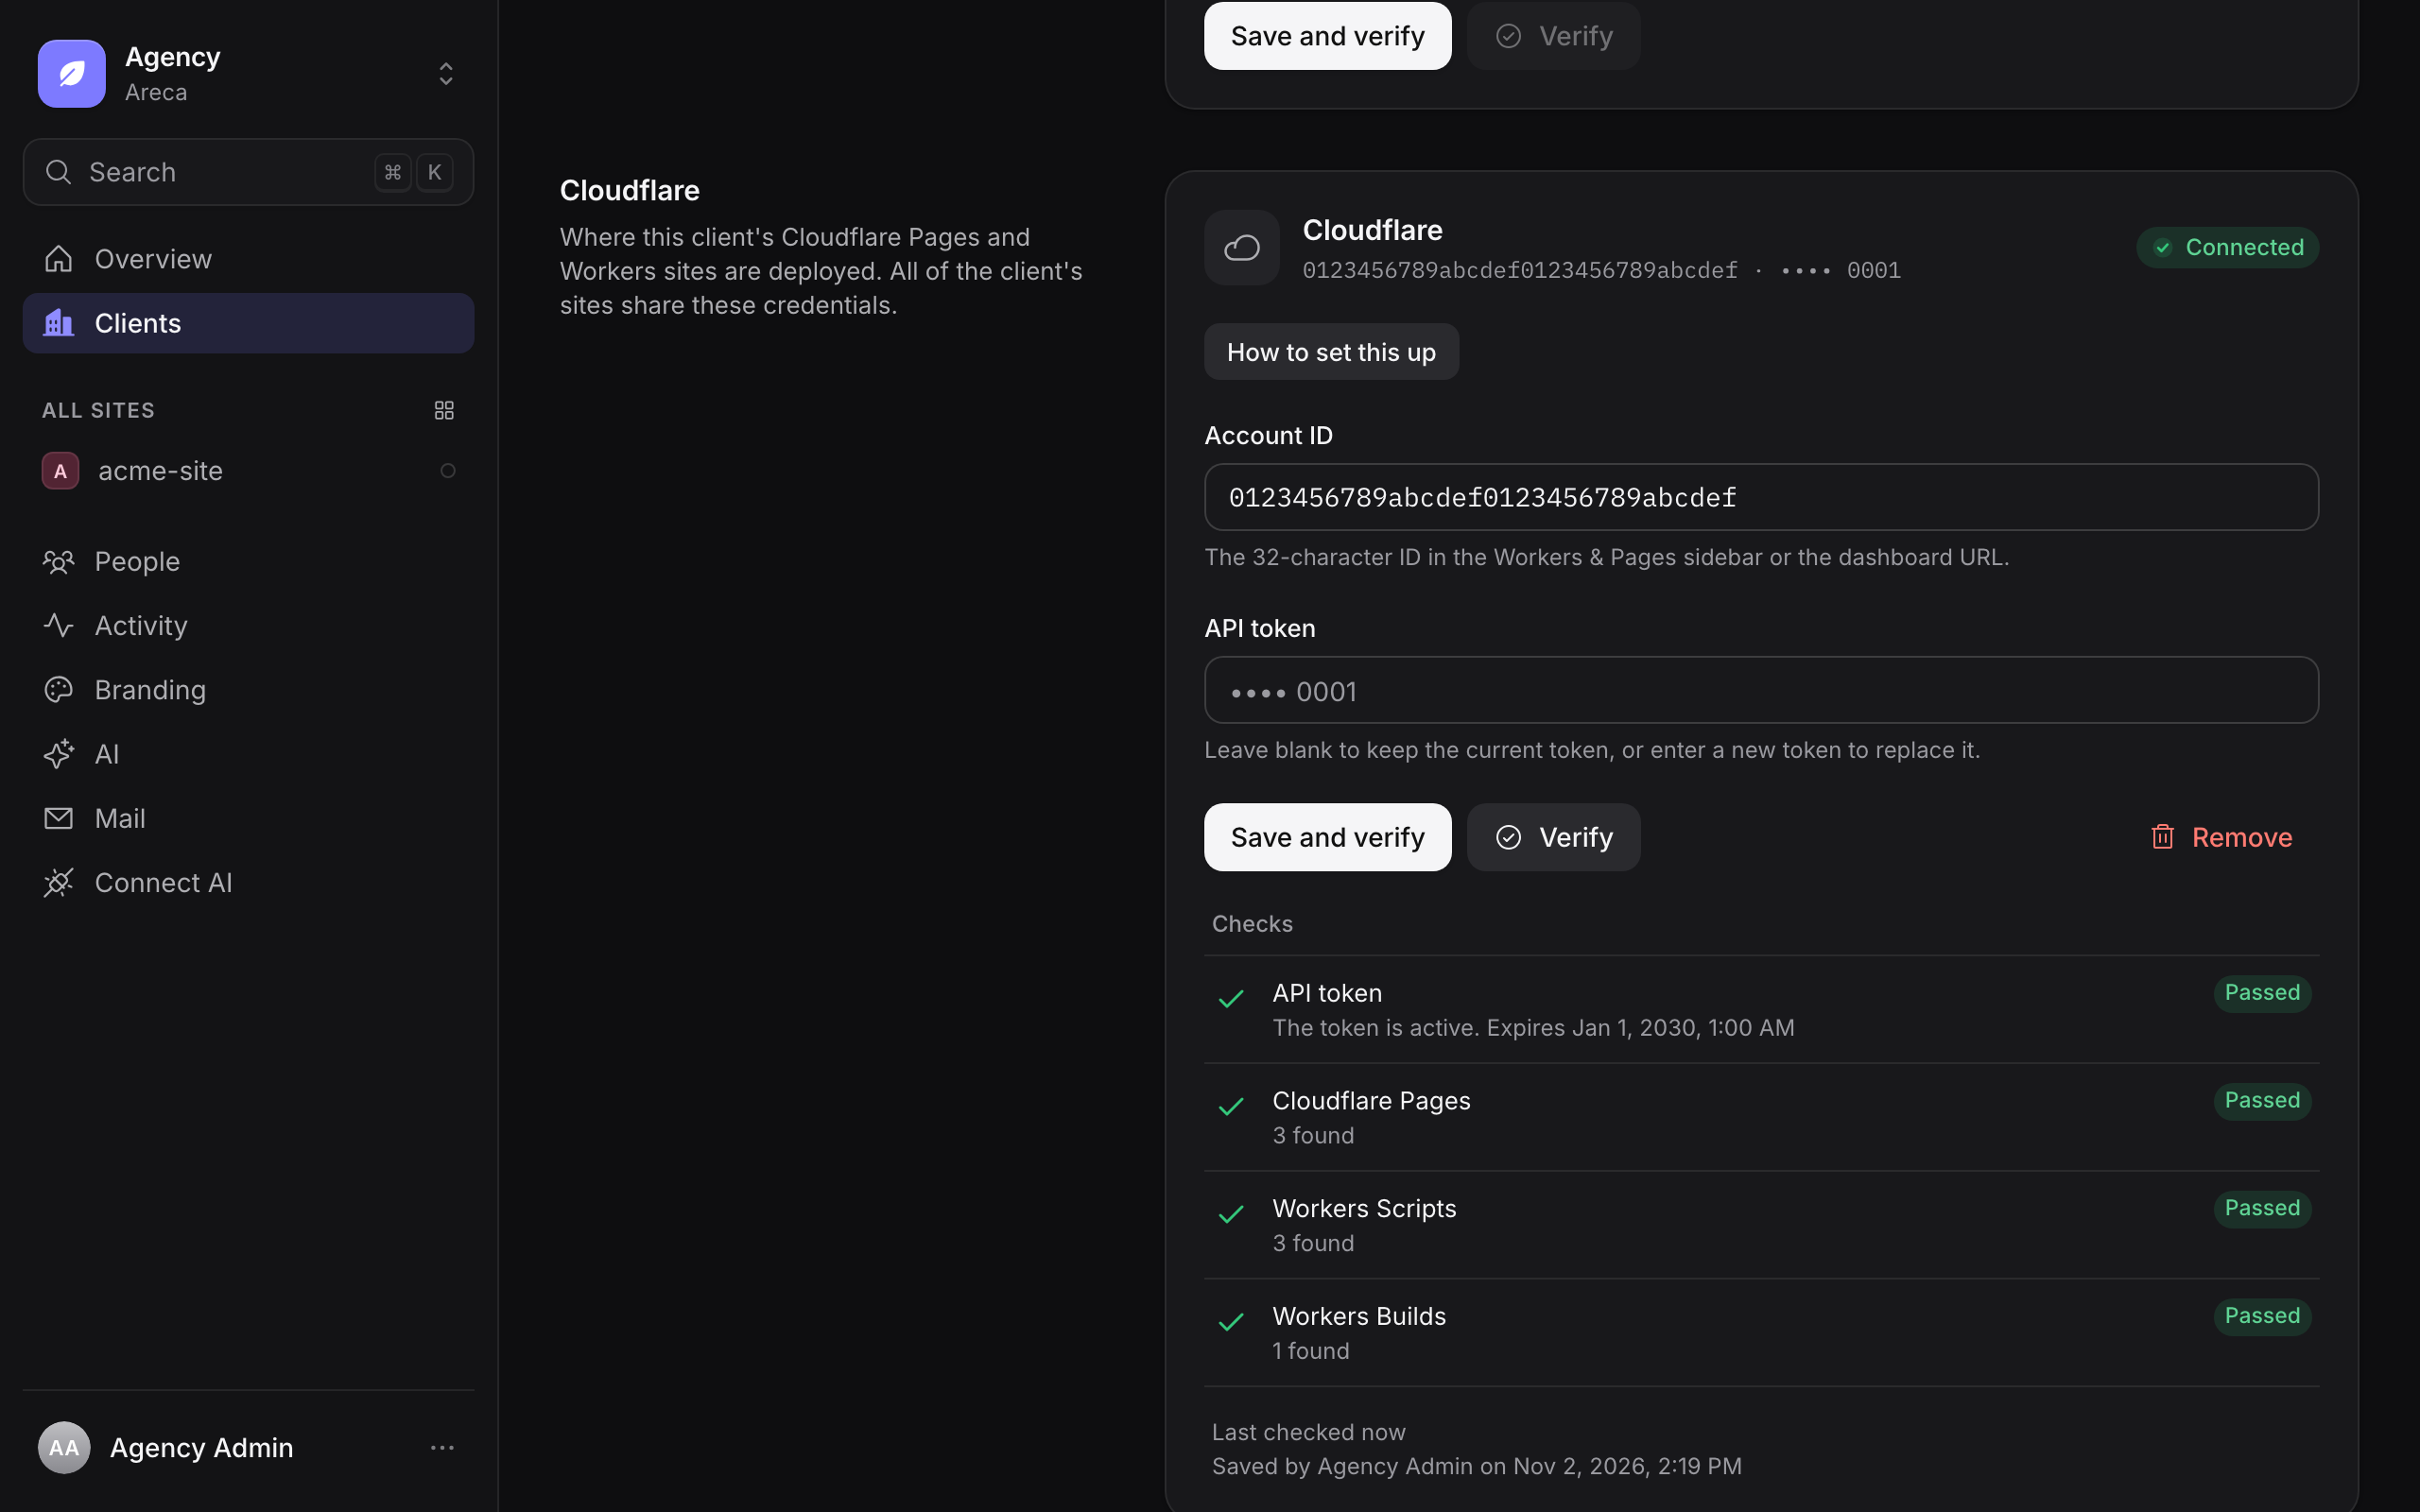
Open the site's Settings › Deployment tab. Under Provider, select Dokploy or Cloudflare. The site is built and hosted by the provider you choose when it goes live.
- A provider that the client has not connected is disabled, with a link such as Set up Cloudflare for
<client>that opens the client's Deployment settings. - When the client is connected, the row shows Connected for
<client>and Manage in Agency. - Switching the provider clears the chosen target. Choose the project again after you switch.
- While a release is pending, these settings are locked. See changes locked during a release.
Changes locked during a release
While a release of the site is queued, building, validating or deploying, or while its outcome is unknown, you can't change the Publishing mode, the Provider, the project or application, or the Health check URL. The Deployment tab disables these controls, and Save and Stop deploying… too. The tab shows this notice:
A release is in progress or its outcome is unknown. You can change deployment settings once it has finished or been checked.
The server refuses the same change when it is sent another way, such as the MCP tool set_publishing_mode. Other site settings, such as the name and the URLs, stay editable. When the release has finished, or an uncertain release has been reconciled, the settings unlock. See uncertain deployments.
Set the application for a Dokploy site
With Dokploy selected, choose the application for the site.
- Application. When the client is connected, Areca lists the Dokploy applications the credentials can see. Select one from the list. If the list is long, search it by name.
- Or enter the application ID. If you can't see the application in the list, type its ID. Find it in the application's URL in Dokploy. Areca marks an ID that isn't in the list as Not in the list.
- Health check URL. The address Areca calls after each deploy. It must use
httporhttps, and it must report the publication ID that Areca sends to the site. The field is required in Production mode, and Go live is blocked until it is set. Demo sites skip the health check. See deployment targets for the details.
Select Save to store the changes.
Areca checks the health URL after each deploy, not when you save. To confirm the URL works before you go live, open it in a browser and check that it responds.
Choose a Cloudflare project
With Cloudflare selected, choose the project in the Project field. This is a single searchable picker, and it has no field for entering an ID by hand.
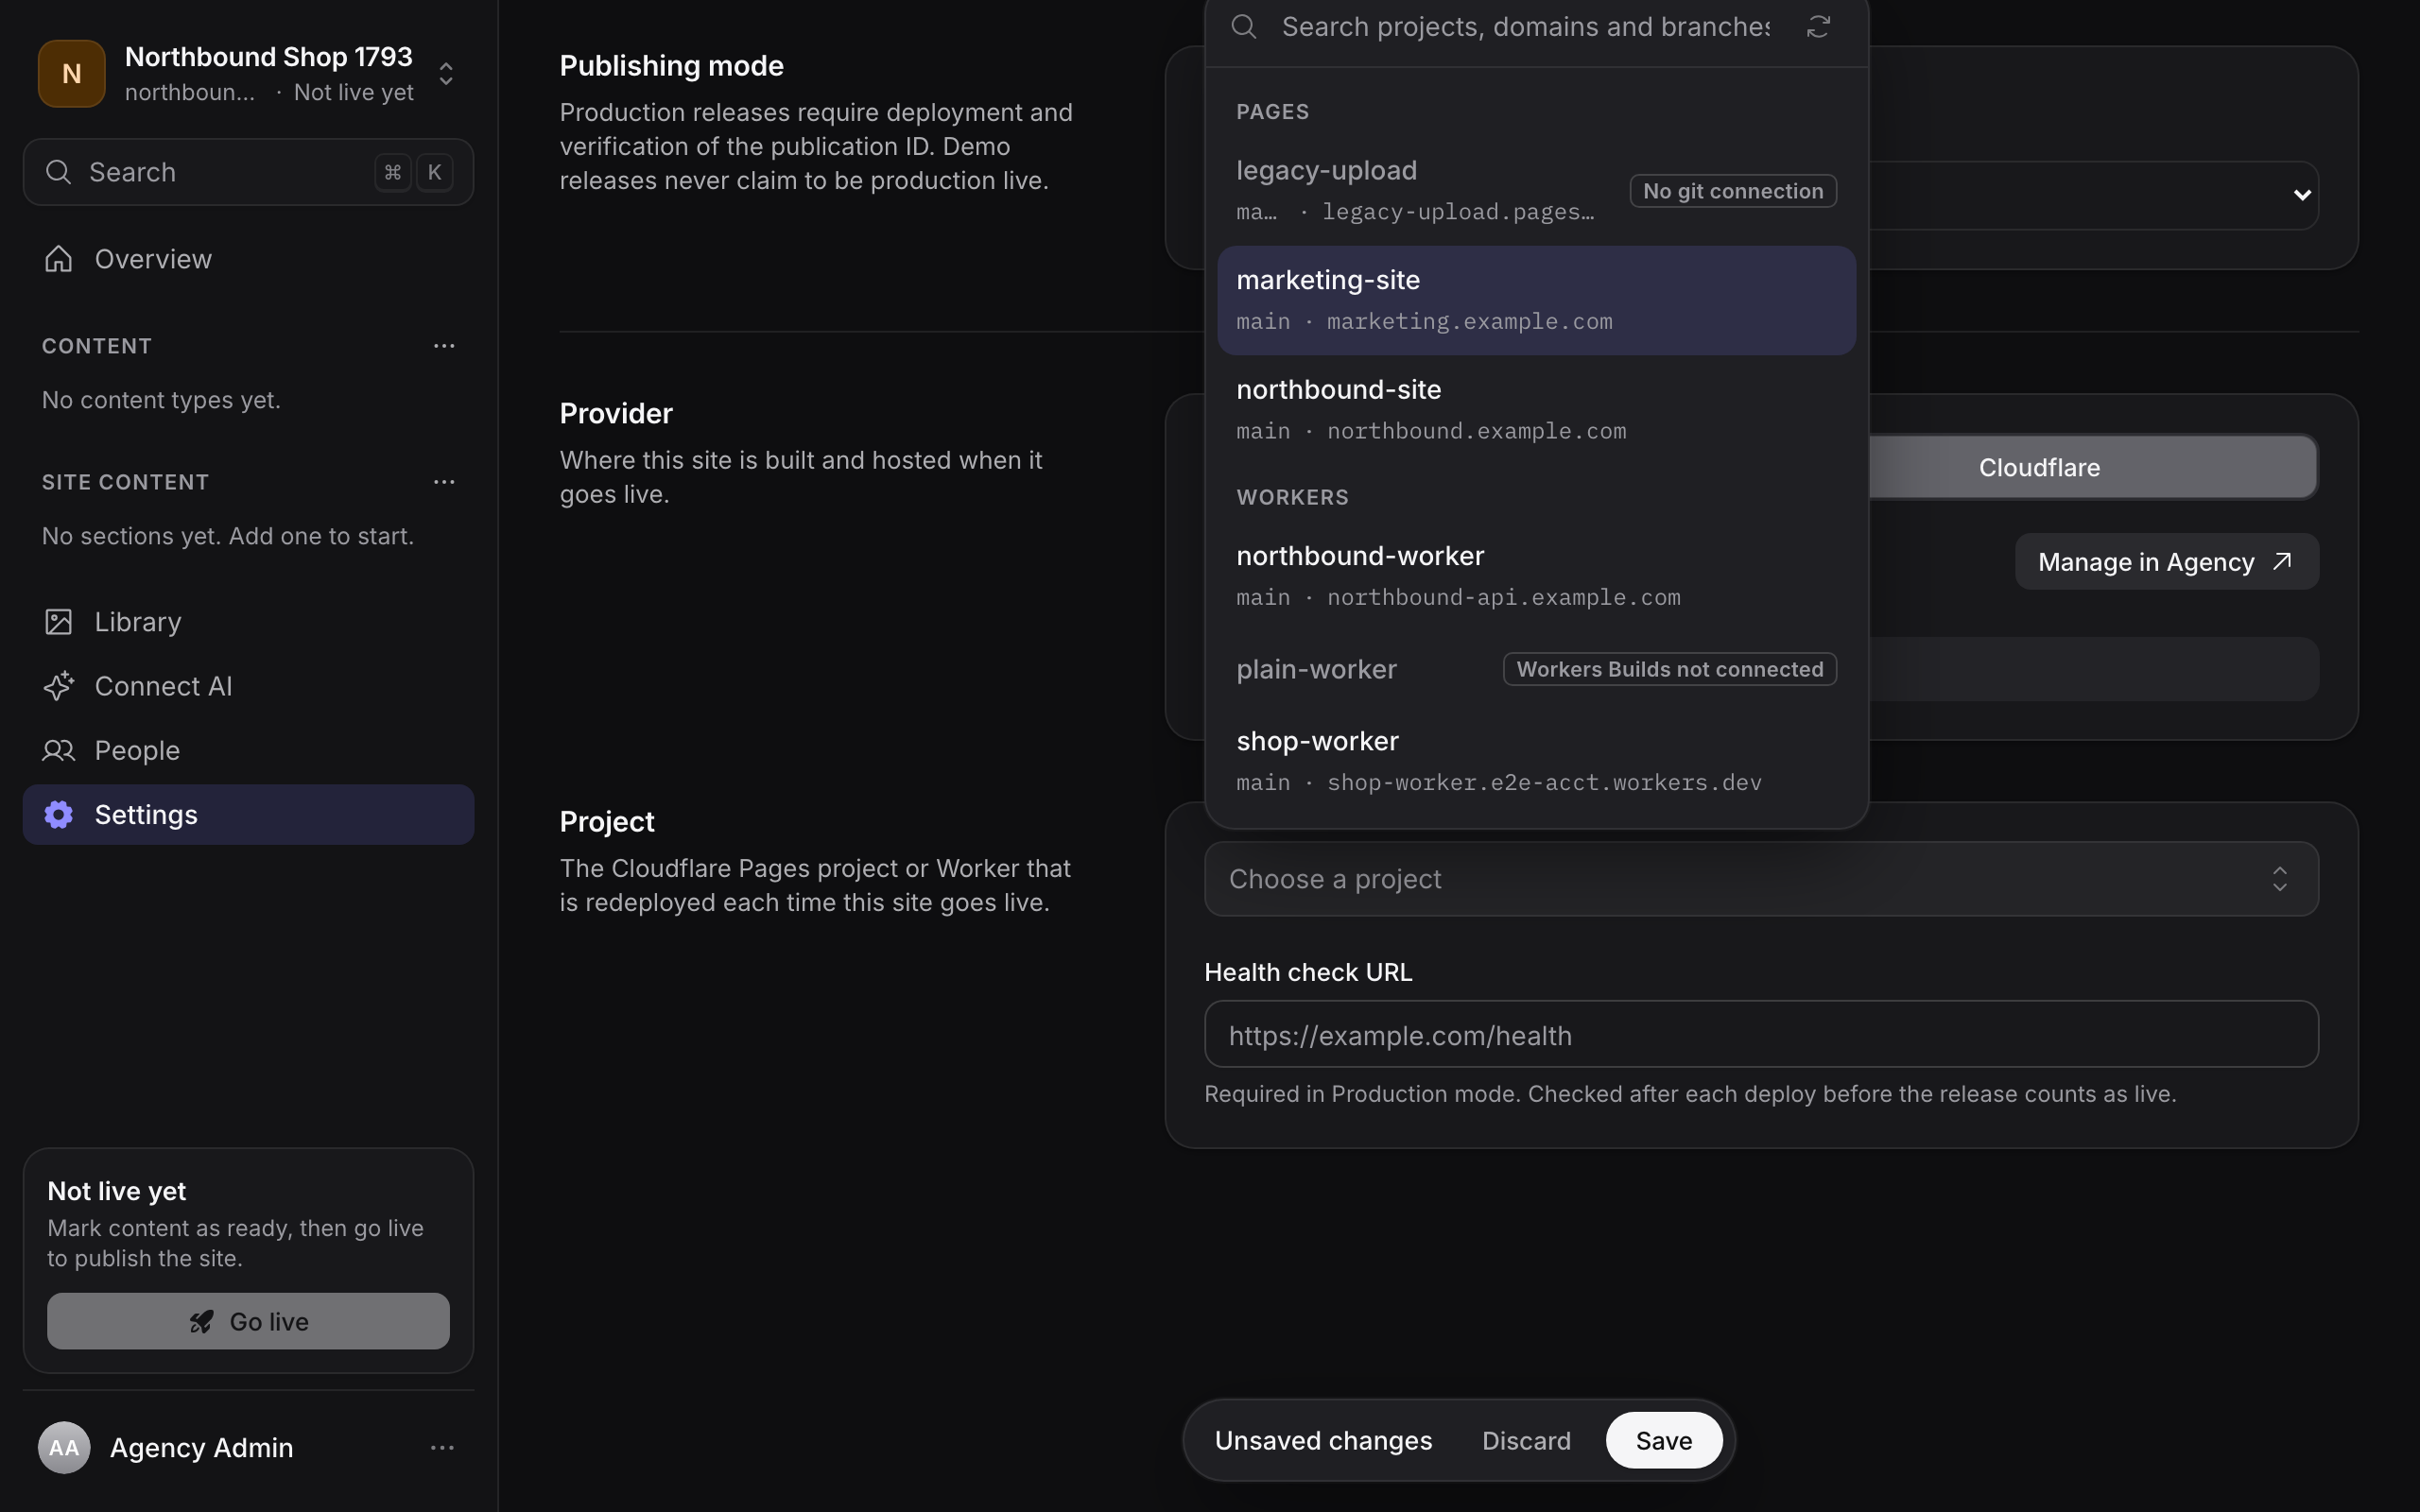
- Search. Type to filter the list. The search matches the project name, the domain and the branch.
- Groups. Projects are grouped under Pages and Workers.
- Rows. Each row shows the project name, its production branch and its main domain.
- Disabled rows. A project that cannot be built is disabled, with the reason beside it. A Pages project without a Git connection shows No git connection. A Worker without any Workers Builds trigger shows Workers Builds not connected. A Worker whose triggers all upload preview versions shows No production build trigger.
- Refresh list. Select the refresh icon to reload the list from Cloudflare.
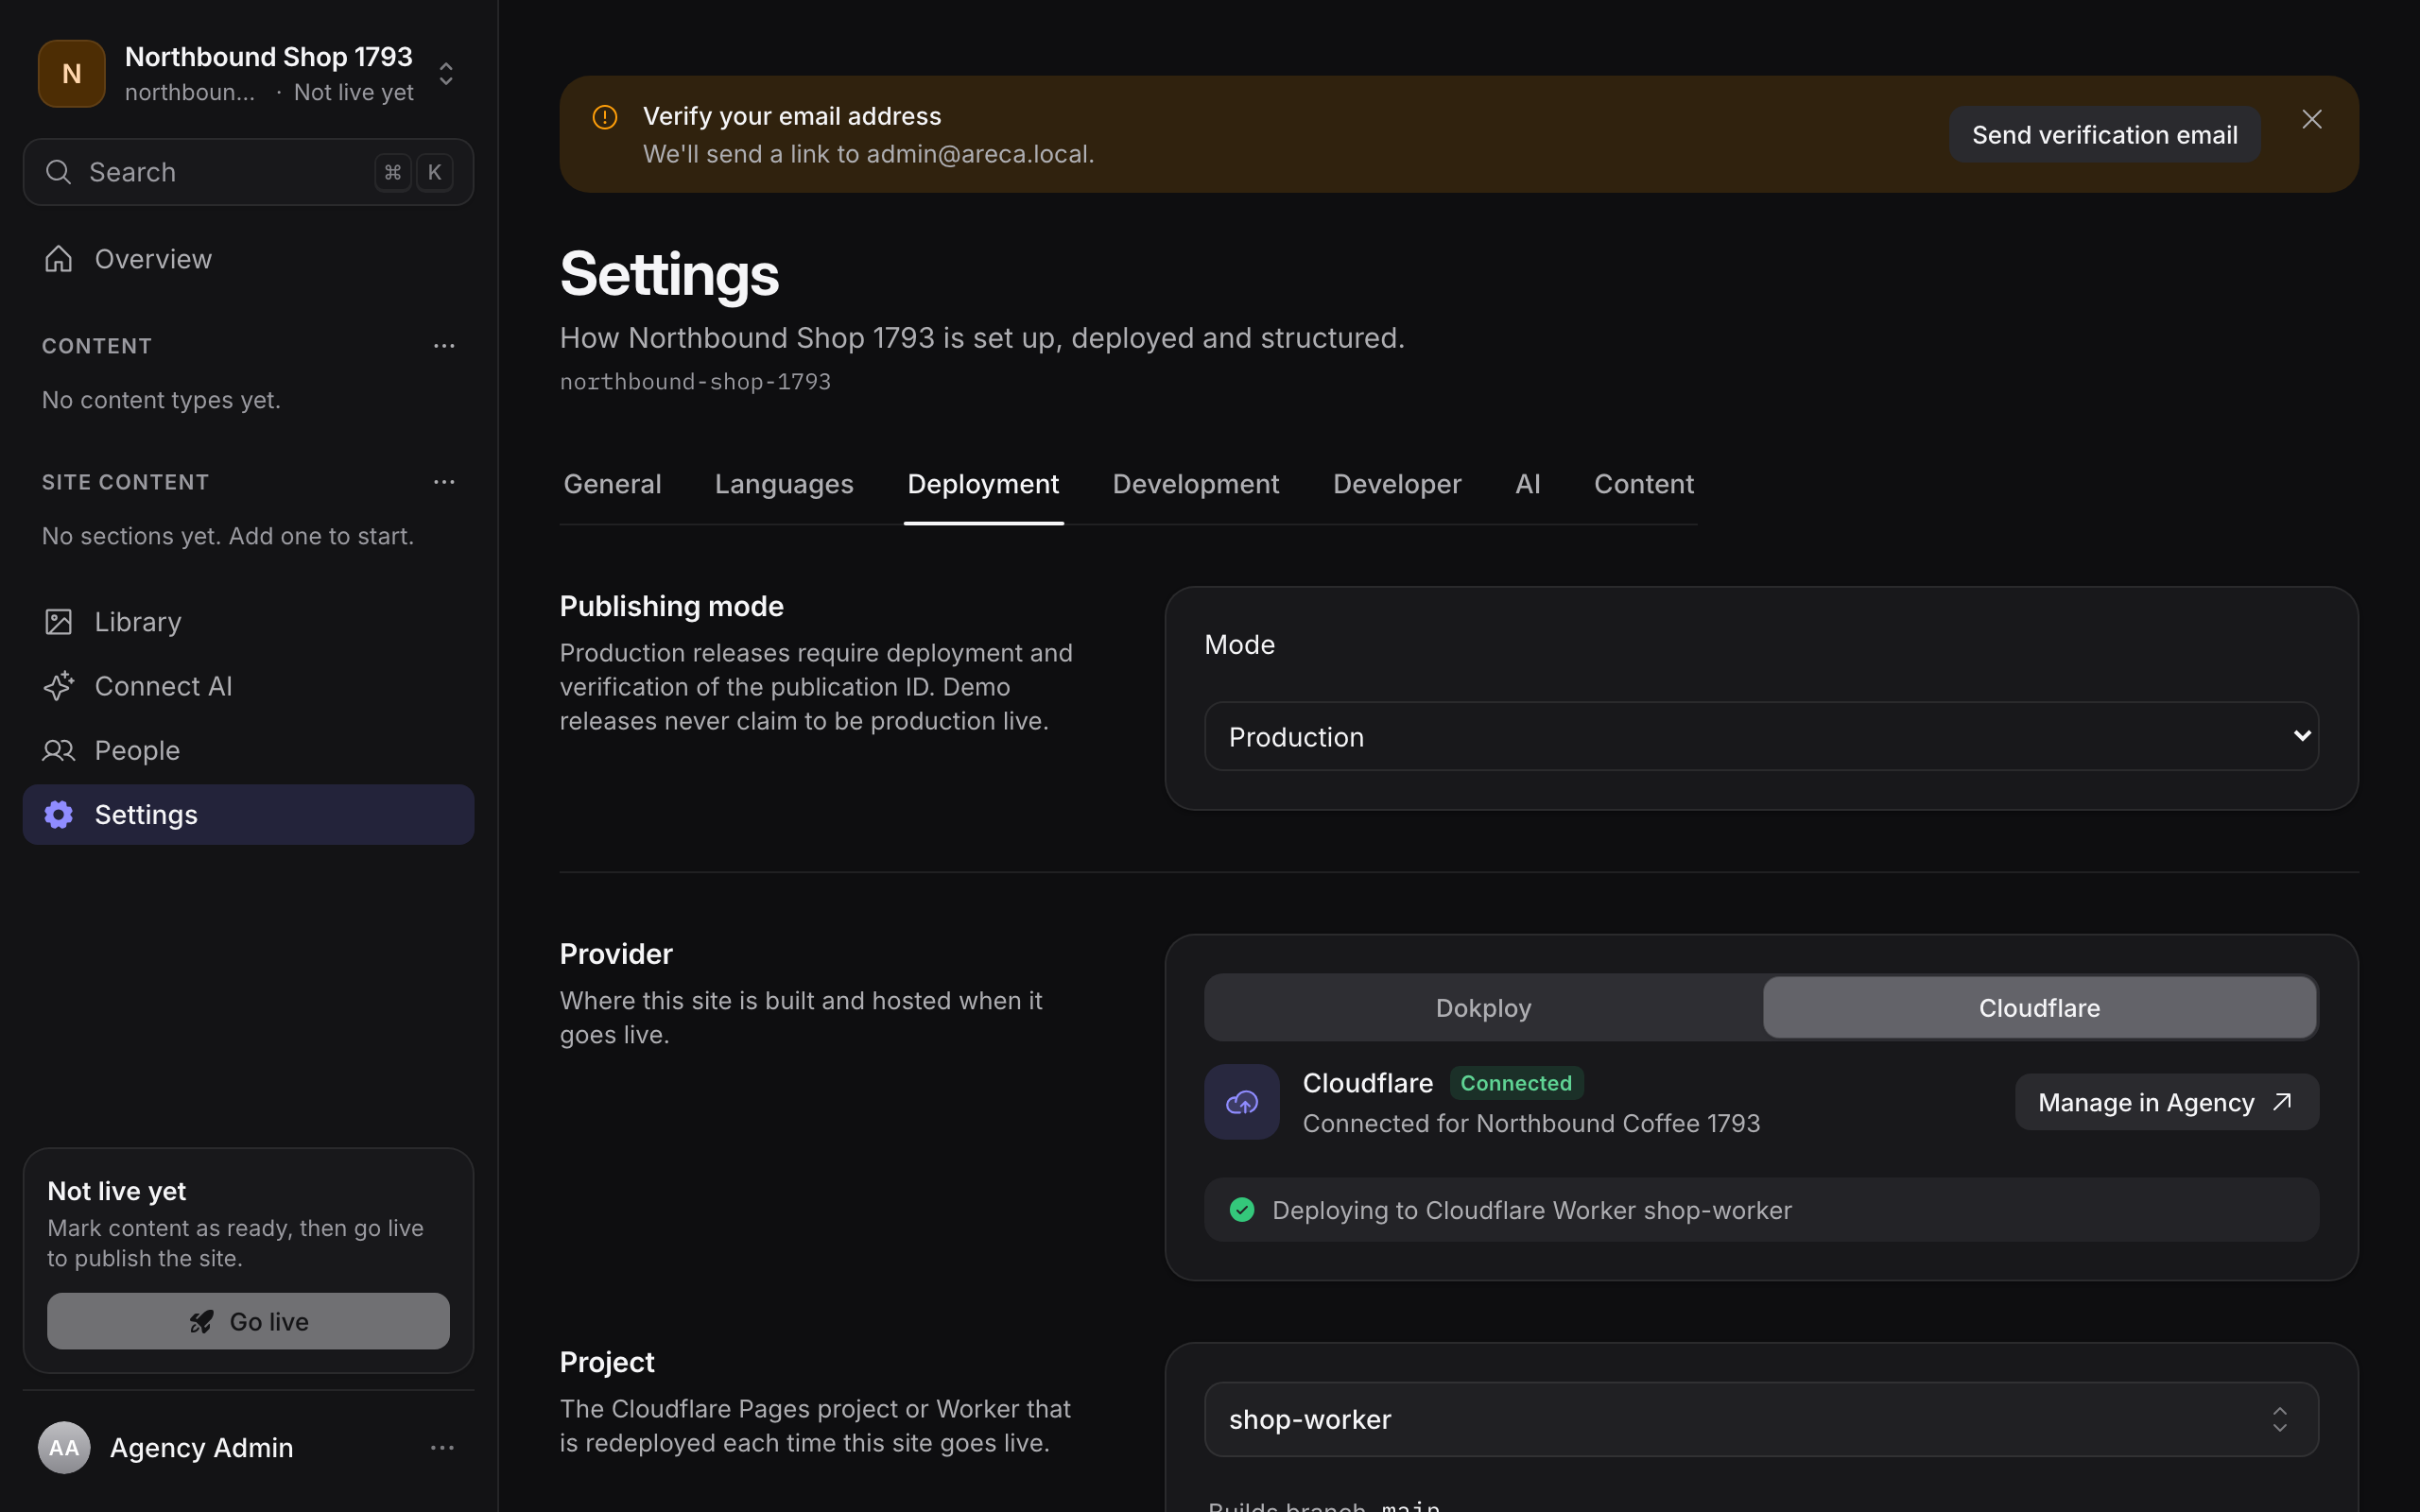
When you choose a project, Areca saves its production branch and shows it as Builds branch. For a Pages project, this is the project's production branch. For a Worker, it is the branch of the build trigger. To pick up a change in Cloudflare, choose the project again.
For a Worker with exactly one production trigger, Areca pre-selects that trigger. A preview trigger is one whose deploy command is wrangler versions upload. It never goes live, so Areca never pre-selects it. Areca doesn't check which branch is the production branch, so check Builds branch before you save.
When the Worker has more than one trigger, a Build trigger select appears, with the note "The trigger for the production branch. Preview uploads never go live." Preview triggers are listed in it but can't be chosen. If the Worker has two or more production triggers, choose one in the select before you save. A Worker whose triggers are all preview triggers is disabled with No production build trigger.
Health check URL is filled in from the project's first custom domain, followed by /api/health. If there is no custom domain, Areca uses <project>.pages.dev for a Pages project, or <worker>.<account-subdomain>.workers.dev for a Worker. Edit it if the site serves its health route somewhere else. The field is required in Production mode, and Go live is blocked until it is set.
If a saved project no longer exists in Cloudflare, the picker shows Not found in Cloudflare — choose again. Choose another project before you go live.
When the site is saved, the status reads Deploying to Cloudflare Pages project <name> or Deploying to Cloudflare Worker <name>. Stop deploying… works the same way as for Dokploy.
Select Save to store the changes.
Stop deploying
Stop deploying… removes the target and the health check URL from a site. The site stops deploying through its provider. It works for both Dokploy and Cloudflare.
A Production site can't go live without a target
If the site is still in Production mode, Go live is blocked until you choose a target and a health check URL again. To release without deploying, switch the site to Demo first.
Related
- Deployment targets: how the Dokploy and Cloudflare targets, their credentials and health checks work for operators.
- Going live: what happens when you publish a release.
- Site settings: the other tabs for each site.
- Configuration: the settings an operator sets for the installation.
Managing people
For agency admins. Find people across the agency, add them to several clients at once, change their roles, block or unblock them, sign them out everywhere, reset two-factor, and delete them.
Branding
Set the CMS name, logo, favicon, theme, accent colour, font and invitation sender name, and see where each one appears.