 Areca Docs
Connect AI
Connect ChatGPT, Claude, Claude Code, Cursor, VS Code or another AI app to one of your sites with one connector URL and a browser sign-in. What the consent screen asks, how to manage connected apps, and what to do when a connection fails.
Connect AI lets an AI assistant work on one of your sites. You copy the site's connector URL, add it to your AI app once, then sign in to Areca in the browser and approve. After that you can ask the assistant in plain words, for example "Write a blog post about our spring menu, with SEO filled in." The assistant reads the site, creates or edits drafts, and uploads images from web addresses. It never publishes by itself unless you allow publishing when you approve.
The assistant acts as you. It can do what you can do on that site, and no more. If your role changes, what the assistant can do changes with it, straight away.
Connect AI is not the same as AI settings or the Generate with AI button in the SEO panel. Those use an OpenRouter key that an agency admin saves, to suggest SEO text and alt text inside the CMS. Connect AI lets an AI app that you use, such as ChatGPT, Claude or Cursor, read and write the site.
Open it from Connect AI in the sidebar, or from the card on the site's Overview page.
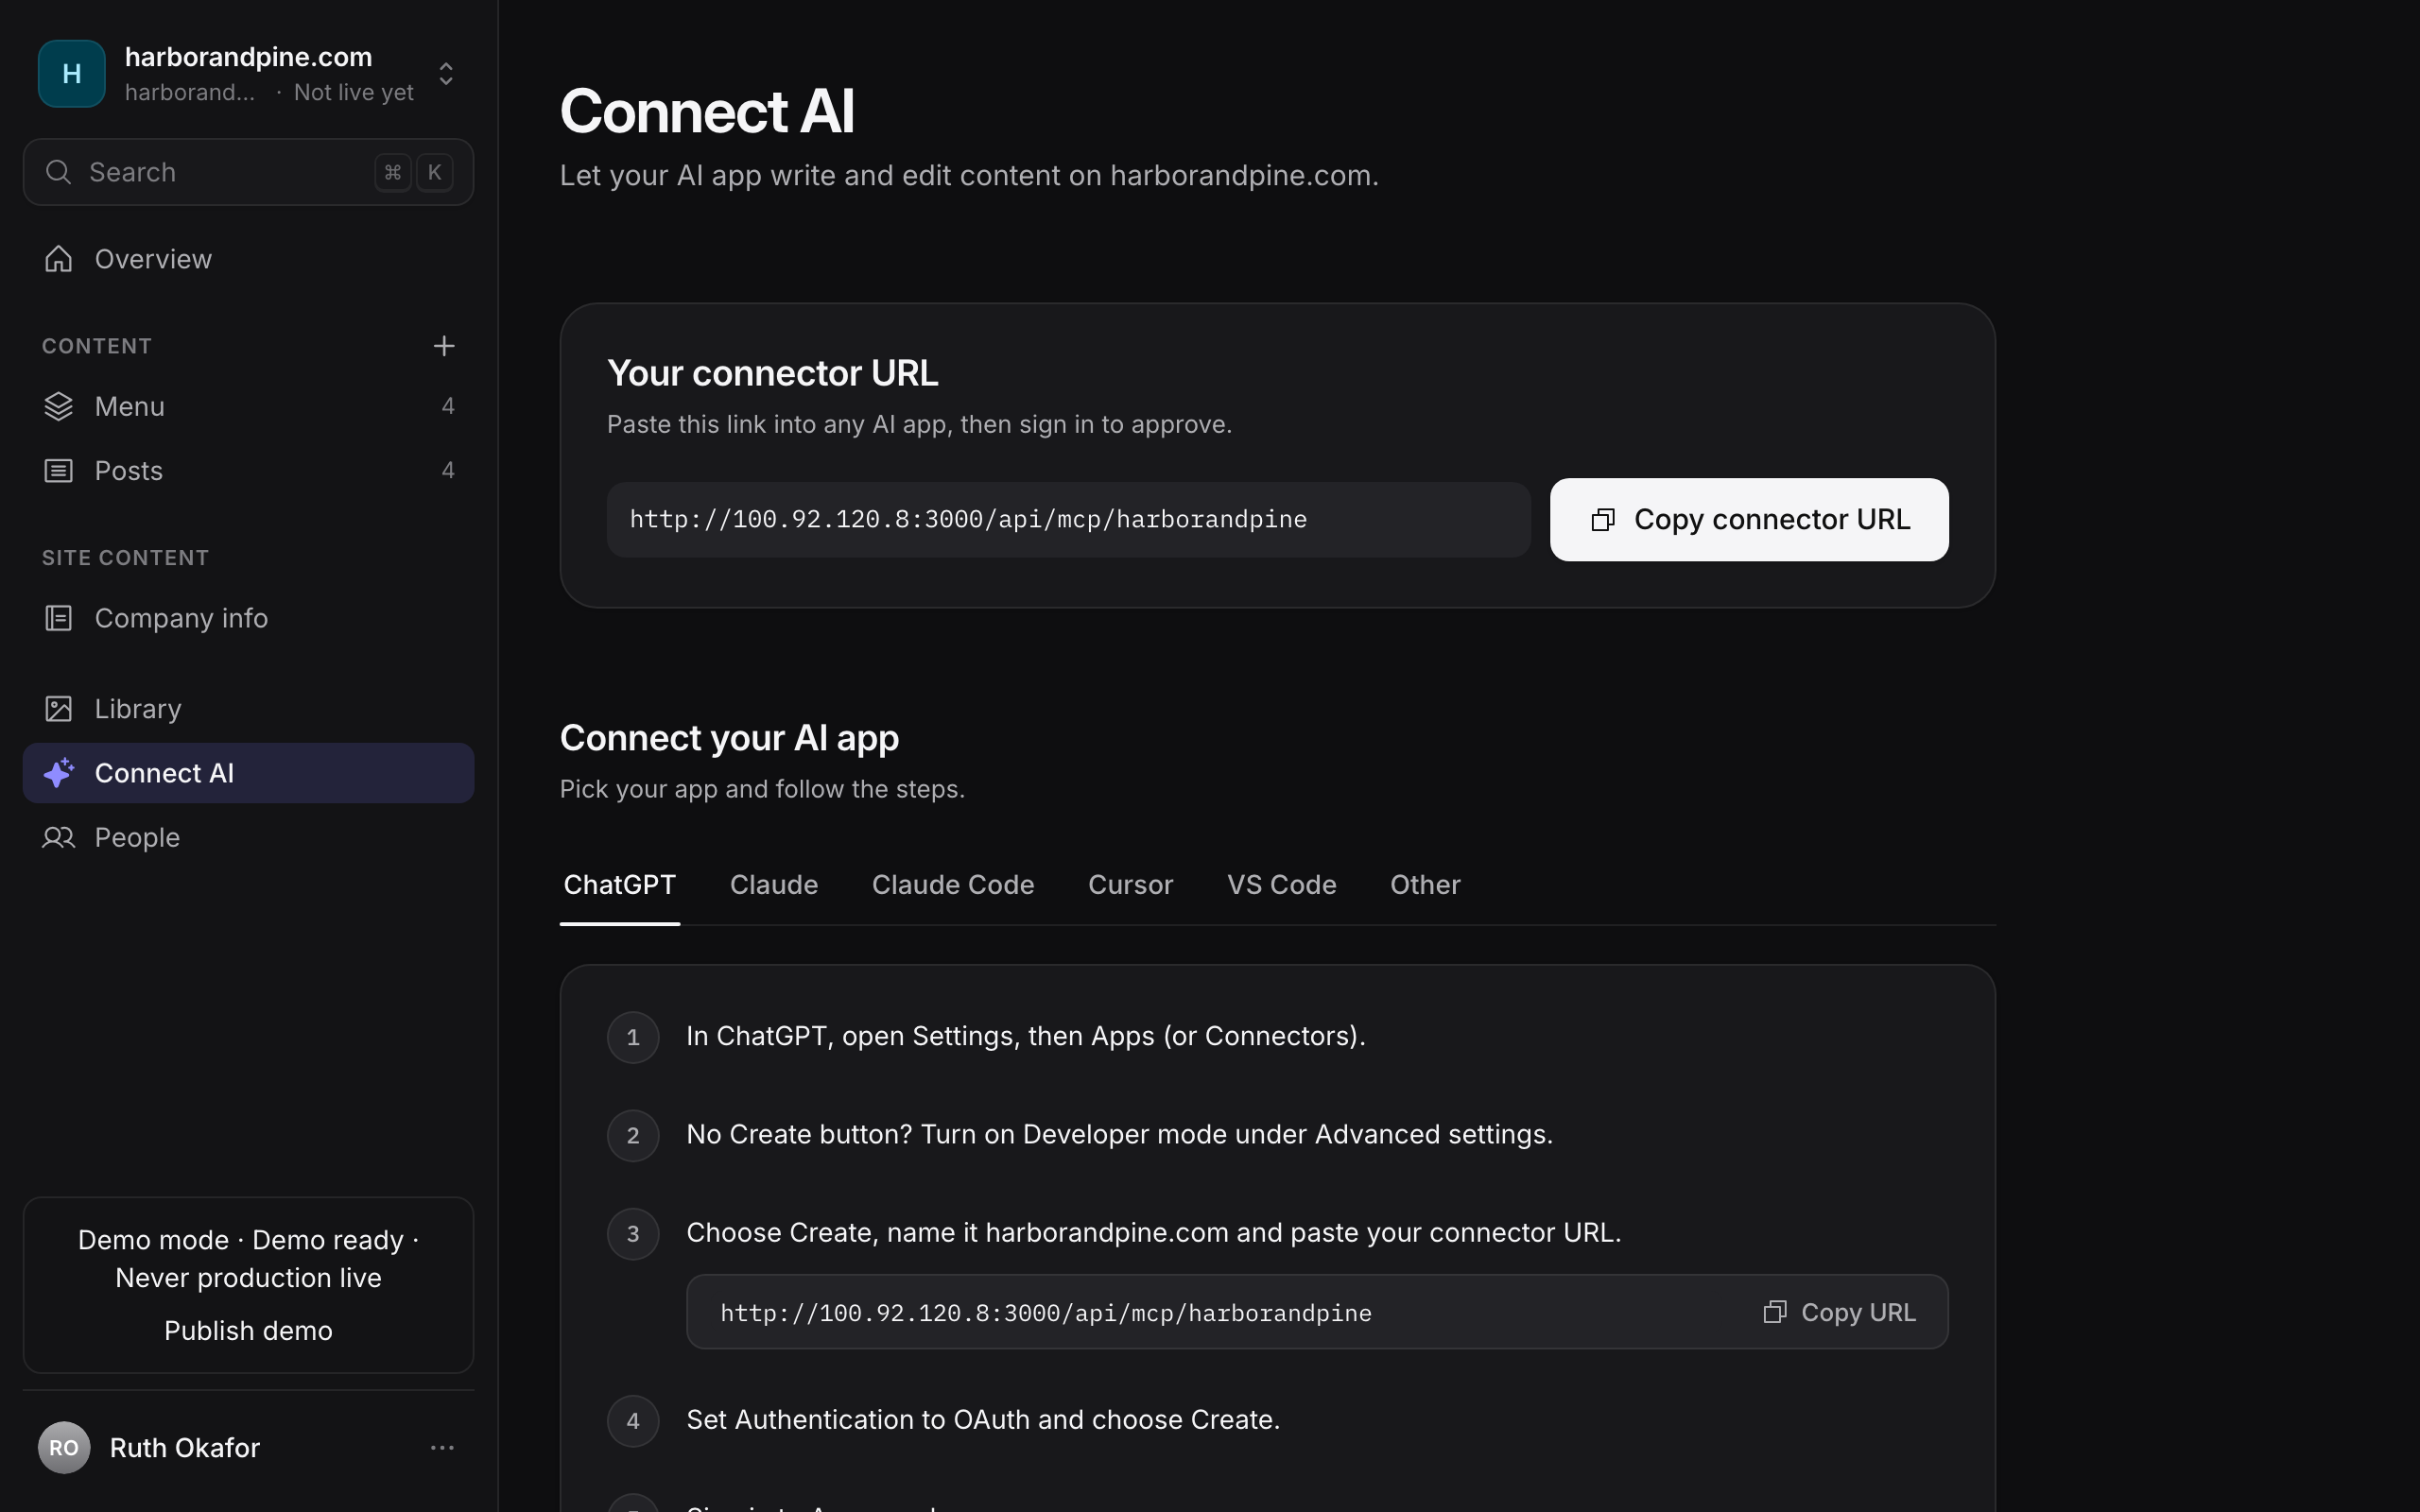
What your AI can do
The tools your AI sees depend on your role on that site. Areca checks your current role every time the AI makes a request.
| What the AI can do | Editor | Owner | Owner, publishing allowed | Agency admin |
|---|---|---|---|---|
| See the site, its content types and their fields | ✓ | ✓ | ✓ | ✓ |
| List, read and search entries | ✓ | ✓ | ✓ | ✓ |
| Create entries and edit their drafts | ✓ | ✓ | ✓ | ✓ |
| Get a preview link for a draft | ✓ | ✓ | ✓ | ✓ |
| Browse the Library, upload from a web address, edit alt text | ✓ | ✓ | ✓ | ✓ |
| Mark an entry ready, unpublish, archive, delete, restore an earlier version | – | ✓ | ✓ | ✓ |
| Schedule an entry, or cancel a schedule | – | ✓ | ✓ | ✓ |
| Delete a Library file that is not in use | – | ✓ | ✓ | ✓ |
| Go live, roll back, cancel a queued build | – | – | ✓ | ✓ if the app was allowed to publish |
| Create or delete content types (collections) | – | – | – | ✓ |
| Write a translation of an entry or section, one language at a time | ✓ | ✓ | ✓ | ✓ |
| Change the site's languages | – | – | – | ✓ |
Connected apps follow the same rules as the buttons in the CMS. An editor's AI cannot mark an entry ready, just as an editor cannot press the button. When the AI is refused, it explains why and who can do it.
The Connect AI page shows one sentence for your role, under the heading, for example "Your AI can write and edit drafts and upload files. Only an owner can mark a post ready or publish it."
Two details matter in practice:
- Publishing is opt-in. You decide on the consent screen whether the app may publish the site. The option is shown only to owners and agency admins, and it is off unless you tick it. Even then, the app can publish only while you are still an owner or agency admin.
- Content types are agency-only. Only an agency admin's connection can change them, and if the site gets its content types from code, the next manifest push overwrites those changes. See troubleshooting.
Before you start
- You must be a member of the client that owns the site.
- Your AI app must support remote MCP servers that sign in with OAuth. ChatGPT, Claude, Claude Code, Cursor and VS Code do. Some apps only accept a settings file, see Other apps.
- The CMS must be reachable on its public HTTPS address. ChatGPT and Claude connect from the internet, so a CMS that only works on a local network cannot be used with them. If you run Areca yourself, see production.
- You need a web browser where you can sign in to Areca and approve. Claude Code, Cursor and VS Code receive the approval on localhost, so their browser must be on the same computer as the app.
Agency admins who manage many clients can connect one agency connector instead of one connector per site. It is one address for every client and site, and each call names the site it acts on.
Connect your AI app
Every app uses the same three steps.
Copy your connector URL
Open Connect AI for the site. The Your connector URL panel shows one link for this site, in the form https://<your CMS>/api/mcp/<site-slug>. Select Copy connector URL. The link identifies the site, so each site has its own URL. Keep it handy; you paste it in the next step.
Add it to your AI app
Pick your app in the Connect your AI app guide, and follow its steps. Most take a minute. The guide shows the exact menu names for each app, and the same steps appear in the Or paste this into your AI prompt if you want the assistant to do the setup itself.
Sign in and approve
When the app asks you to sign in, a browser window opens on Areca. Sign in, check the consent screen, and select Allow. The app then receives its permission and you can ask it to write for you. Each app asks for this once per site and reconnects on its own while it is in use.
ChatGPT
These steps work in the ChatGPT web app and the desktop app. Menu names can change between versions, and creating custom connectors depends on your ChatGPT plan, so the options you see may differ.
- Open ChatGPT and go to Settings, then Apps (or Connectors).
- If you don't see Create, turn on Developer mode under Advanced settings first.
- Choose Create. Name it after the site, for example
acme-site, and paste your connector URL as the MCP server URL. - Set Authentication to OAuth, then choose Create.
- Sign in to Areca and approve. Then ask ChatGPT to write for you.
ChatGPT connects from the internet, so the CMS must be on a public HTTPS address.
Claude
Claude uses a custom connector. Add it on claude.ai. The same connector then also appears in the Claude desktop app and the Claude mobile app.
- Open Claude and go to Customize, then Connectors.
- Choose + Add, then Add custom connector.
- Name it after the site, and paste your connector URL.
- Choose Add, then Connect. Sign in to Areca and approve.
Claude also connects from the internet, so the CMS must be on a public HTTPS address. Menu names can change between Claude's apps; if they differ, look for the connector or custom connector settings.
Claude Code
-
Copy the command from the guide and run it in a terminal. It has this form, with your own site's name and URL:
claude mcp add --transport http areca-acme-site https://cms.example.com/api/mcp/acme-site -
Start Claude Code, type
/mcp, choose thearecaserver for your site, and select Authenticate. Sign in to Areca and approve.
The server name in the command is areca- followed by the site's slug.
Cursor
- Select Add to Cursor on the Connect AI page. Cursor opens and asks you to confirm.
- When Cursor asks, sign in to Areca and approve.
If the button does not open Cursor, expand If the button doesn't work and add the shown settings to your Cursor MCP settings (~/.cursor/mcp.json).
VS Code
- Select Add to VS Code, or Add to VS Code Insiders if you use that edition. VS Code opens and asks you to confirm.
- Start the server when VS Code asks, then sign in to Areca and approve.
Other apps
Apps such as Windsurf or Gemini CLI can use the same URL if they support remote MCP servers that sign in with OAuth. The steps are:
- Paste your connector URL where the app asks for an MCP server URL, remote server or custom connector.
- Sign in to Areca in the browser window when the app opens it, and approve.
Some apps only accept a settings file. The Connect AI page shows the settings in the standard mcpServers form with the URL only, and no secret. Apps name the field for a remote HTTP server differently, so check your app's documentation for the exact field name.
Coding agents
The Claude Code, Cursor, VS Code and Other apps tabs also show npx @areca-cms/skills --mcp-url <connector URL>. Run it in the website project. It installs the Areca agent skills, which teach the agent these tools and the site SDK, and adds the connector to the coding agents you pick, including Codex, Gemini CLI, OpenCode and others.
Or paste this into your AI
If you are not sure which app to use, or you use a different assistant, select Copy prompt under Or paste this into your AI and paste it into the chat. The assistant follows the prompt to connect itself, then asks you to sign in and approve. Check that it reports the site's name when it has finished.
Treat the connector URL as an address, not a password. It contains no secret, but the app you add it to will be able to act on the site once you approve.
Check the connection
Ask your AI: "What can you do on my site?" It calls get_site_info and reports your role and the content types it can use. If it cannot connect, see troubleshooting.
The consent screen
When you sign in, Areca shows a consent screen before anything is connected. It is the only place you approve an app, so read it before you select Allow.
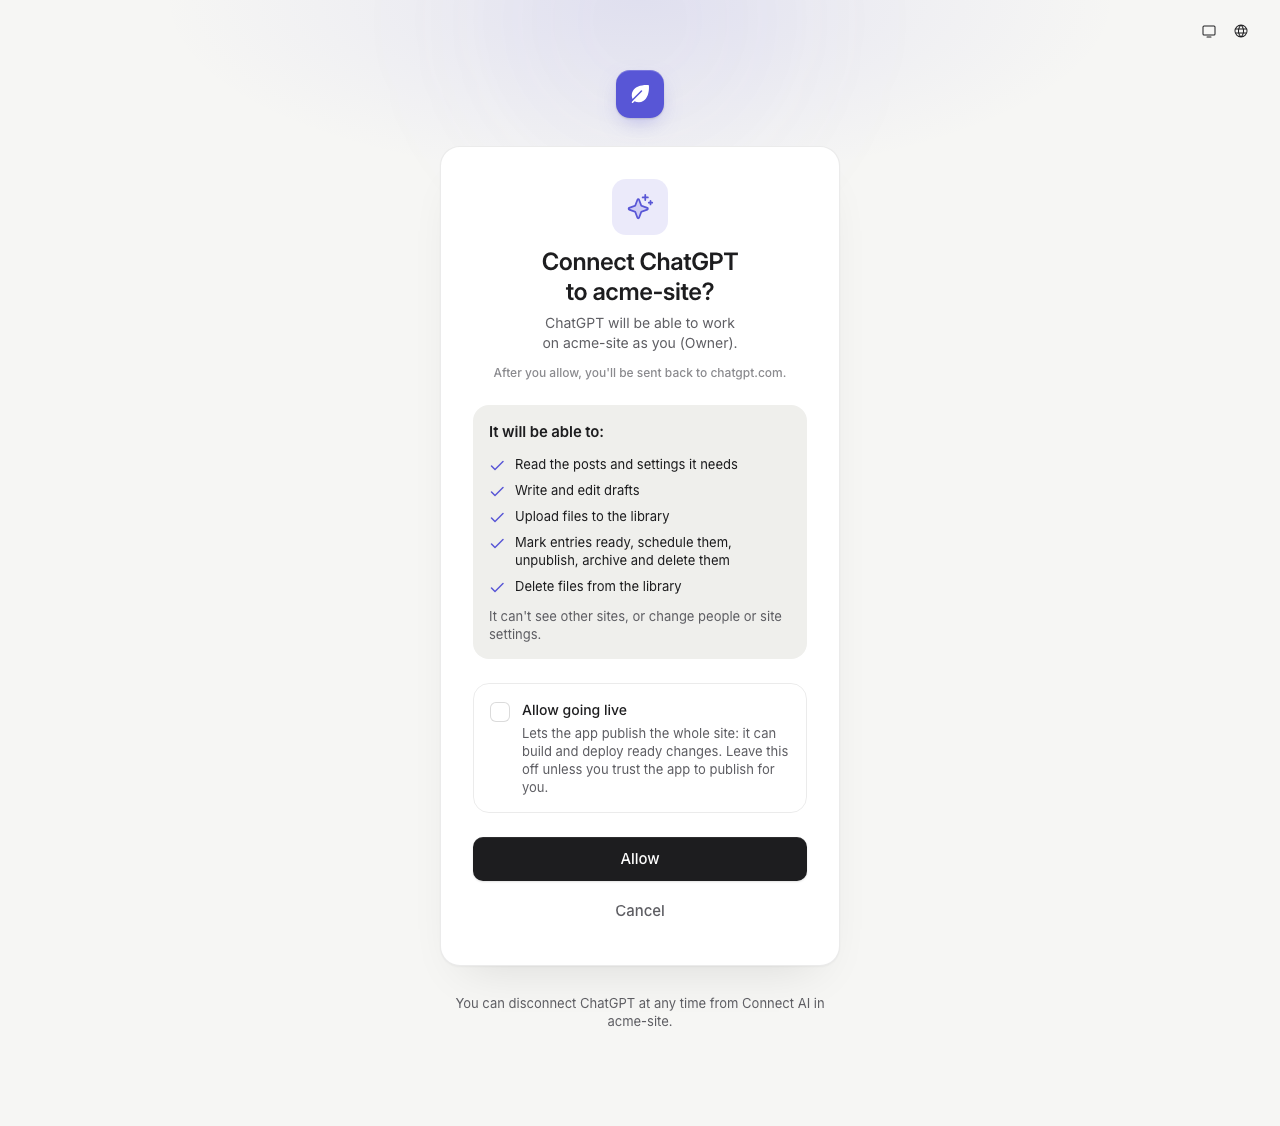
The screen shows:
- The app and the site. For example "Connect ChatGPT to acme-site?". The app's name comes from its registration, so check it matches the app you started from.
- Your role. "will be able to work on acme-site as you (Owner)". The app acts with your role on that site, not with more rights.
- Where you will be sent back. "After you allow, you'll be sent back to …" shows the address the app will receive the approval at. If it is not the app's address, select Cancel.
- What it will be able to do. Reading the posts and settings, writing and editing drafts, and uploading to the Library. Owners and agency admins also see marking entries ready, scheduling, unpublishing, archiving and deleting, and deleting Library files. Agency admins also see changing content types.
- What it cannot do. "It can't see other sites, or change people or site settings."
Choose one of the options:
- Allow connects the app to this site. The app is then listed under Connected apps on the Connect AI page.
- Cancel refuses. Nothing is connected, and the app is told you refused.
Allow going live
Owners and agency admins see a checkbox, Allow going live. It is off unless you tick it. Ticking it lets the app publish the whole site: it can build and deploy ready changes. Leave it off unless you trust the app to publish for you. When it is on, the screen adds "Publish the whole site" to the list, and the app can go live, roll back and cancel a queued build while you remain an owner or agency admin. Editors do not see the checkbox, and they cannot allow publishing.
You can change this later by disconnecting the app and connecting it again.
Agency admins confirm with an authenticator code
An agency admin's approval gives the app admin power on the site, so Areca asks for a fresh code from your authenticator app before Allow works. The screen says "You'll be asked for your authenticator code before you allow this." If the code is stale, enter a new one and select Allow again.
Connected apps
The Connected apps section on the Connect AI page lists the apps that are connected to this site.
- Editors see the apps they connected.
- Owners and agency admins see every app connected to the site, including other people's. Each row says whose connection it is.
Each row shows the app's name, who connected it, when, and when it was last used (or "Never used"). A Can go live tag marks an app that may publish the site.
Disconnect an app
Select Disconnect on the app, then confirm. The app stops working on this site straight away, in every place it is used. The disconnect applies to this site only. The app keeps working on your other sites until you disconnect it there too. You can connect it again later, which means signing in and approving again.
Disconnect an app when you stop using it, change computers, or see an app you do not recognise. Owners and agency admins can disconnect any app on the site, for example when someone leaves the team.
How long a connection lasts
A connection lasts until you disconnect it, or until 90 days pass without use. Each use keeps it alive. The app receives short-lived access that renews itself while the app is in use, so you will not normally see a sign-in prompt.
If an app has not been used for 90 days, it stops working and you must connect it again. The app then asks you to sign in again.
Your role changes
Connected apps follow your live role. If an owner becomes an editor, the app loses publishing rights at once. If you leave the client, the app's requests are refused. You do not need to disconnect it, but doing so tidies the list.
Who can see what the AI did
Every change made through a connected app is recorded in the site's activity log as you, with the label via AI and the app's name, for example "via AI · Claude". Connecting and disconnecting apps are recorded too. Owners see this in the site's activity. Use it to review what an AI has changed. See history and activity.
Advanced: personal keys
Most people never need a personal key. Use one only for a script, an automated job or an app that cannot sign in through a browser. A personal key is a secret string that you create on the Connect AI page, and it acts as you on one site.
Open Advanced: personal keys at the bottom of the Connect AI page. It lists the keys for this site and has Create AI key. Each key shows when it was created, when it was last used, and when it expires.
- Name. Something you will recognise later, such as "Nightly import". Up to 80 characters.
- Key lasts. 30 days, 90 days, 1 year or never. The default is 90 days.
- Allow going live. Shown only to owners and agency admins. Leave it off unless the script must publish.
Select Create key. The key is shown once. Copy it straight away, because Areca stores only a fingerprint and cannot show it again. The key screen then offers install steps for Claude Code, Cursor, VS Code, Claude Desktop and other apps, with the key already included. Send the key in an Authorization: Bearer header. The key works on the site's connector URL and on the /api/mcp address, and only for the site it was made for. See tokens and MCP endpoint and tools.
Treat a key like a password. Do not paste it into a shared document, a chat with other people or a public repository. To stop a key, select Revoke, then confirm. It stops working straight away and cannot be undone. Agency admins creating a key need a fresh authenticator code, because the key keeps admin power for its lifetime.
Editors see only their own keys. Owners and agency admins see and can revoke every key on the site. You can have up to 20 active keys per site. Keys follow your live role, just like connected apps.
Your data and the AI provider
The AI can read any content you can read on the site, including drafts and unpublished changes. What it does with that text depends on the AI app and its provider, not on Areca. Read your app's data policy before you connect a site with unpublished or confidential content. Areca does not send Connect AI requests to OpenRouter, and the activity log records what was changed, not the text. See AI data handling for the other AI features.
Example prompts
Copy any of these from the Connect AI page, or write your own. Name the content type and the fields when you can. The assistant is told to read the content type's schema before it writes, so the fields it uses match the site.
- "Write a blog post about [topic], with SEO filled in. Leave it as a draft."
- "Draft a new page about [subject] and leave it as a draft."
- "Update the intro on our About page to sound friendlier."
- "Find the posts that are still drafts and list their titles."
- "Add alt text to the images on the Team page."
- "Show me what is ready but not yet live."
The AI writes drafts. Your site does not change until an owner marks the entry ready and the site goes live. See statuses and review and going live.
Troubleshooting
"This sign-in link has expired" or "This link can't be used". The sign-in link is valid for a short time and works only once. Start again from your AI app, so it sends you a new link.
"You can't connect AI to this site" or "You do not have access to this site." Your account is not a member of the client that owns the site, or your access was removed. Ask an owner to add you under People. An agency admin who sees this should check their two-factor sign-in, see the next entry.
"Turn on two-factor authentication in Account settings before connecting AI apps as an agency admin." On an installation that requires two-factor authentication for agency admins, you cannot approve an app until two-factor sign-in is on. Turn it on in Account settings, then start again from the app.
"We can't find that site" or "That site no longer exists." The site was deleted, or the link names a site slug that does not exist. Open the site's Connect AI page and copy its connector URL again.
"This app did not name a site" or "This app is not registered with Areca." The app started sign-in without the site's connector URL, or its registration was lost. Remove the connector in the app and add it again from the site's Connect AI page.
"This approval is for a different site." The approval page was opened for another site than the one shown. Start again from the Connect AI page of the site you want.
The app shows an authentication error, or says it is no longer connected. The connection was disconnected, has expired after 90 days without use, or the app's saved sign-in is out of date. Reconnect: remove the connector in the app and add it again, or use the app's re-authenticate option, for example /mcp and Authenticate in Claude Code. Then sign in and approve. If the app still fails, check that the site appears under Connected apps; if it is listed, the problem is in the app.
The app cannot reach the CMS, or no sign-in window opens. ChatGPT and Claude connect from the internet, so the CMS must answer on its public HTTPS address. A localhost or local-network address does not work with them. Claude Code, Cursor and VS Code need HTTPS for any address other than localhost. If you run Areca yourself, check that APP_URL and BETTER_AUTH_URL are that public HTTPS address, and that the reverse proxy passes /.well-known/ paths to the CMS. See production.
"Your AI can't see a tool I expected." The tools depend on your role. An editor does not see mark-ready or publishing tools, and an app that was not allowed to publish does not see go-live tools. Some apps keep the tool list from the start of a session, so restart the AI session after your role changes.
"Only site owners can…" The action needs an owner. Ask an owner to do it, or ask the AI to leave the entry as a draft.
"Going live wasn't allowed when this app was connected." The app was connected without Allow going live, or its user is an editor. Ask an owner to press Go live in the CMS, or disconnect the app and connect it again with Allow going live ticked. For a personal key, the message is "Going live is not enabled for this key.", and the fix is the same: a key created with Allow going live.
"This entry changed since you last read it." Someone else saved the entry after the AI read it. Ask the AI to read the entry again and apply its change to the new version.
"Could not import the file: …". The AI could not download the image from the address it was given. The rest of the message says why, for example:
- "The link returned a web page (text/html), not an image." Use the address of the image file itself, not the page it appears on.
- "The file is larger than 20 MB." Use a smaller copy.
- "That address is private or local and can't be downloaded." Only public addresses work.
- "The link didn't return a downloadable file (HTTP 404 …)" or a similar HTTP error. Check that the link opens directly in a browser.
- "The download timed out." The file took longer than 15 seconds to arrive.
The file must be a public JPEG, PNG, WebP, GIF or PDF. Links that need a login are refused. You can also upload the file in the Library and ask the AI to use it. The full list is in the technical reference.
A schema change disappeared. When the site gets its content types from a code manifest, the next manifest push replaces the content types changed in the CMS. Change them in the site's configuration instead. See schema sync.
Related
- For technical users: endpoint, sign-in and tools lists the connector URL, the OAuth details, every tool and the field formats.
- Tokens explains how connections and personal keys are stored and revoked.
- Roles and permissions lists what each role can do.
- AI settings covers the SEO and alt-text suggestions that agency admins set up.