 Areca Docs
Writing and editing entries
Create an entry, fill in its fields, rely on autosave, set the slug, and delete or archive entries safely.
An entry is one item of content, such as one article or one team member. This page shows you how to create an entry, how the editor works, and how saving, slugs, deleting and archiving behave. Everything you write starts as a draft, so you can work on it without changing the live website.
Create an entry
Open the content type you want from the sidebar, for example Articles. Then do one of these:
- Select New article (the name follows the content type) at the top of the list.
- Press
n. - Open the New… menu next to Content in the sidebar and choose the content type.
The editor opens with an empty entry. Your role decides whether you can create entries. Editors, owners and agency admins can all create them.
The editor
The editor is a full-page writing area. The sidebar is hidden, so you can focus on the content. The top bar shows:
- Back to the content type, which returns you to the list.
- The save status, such as Saved or Saving….
- Save, the Preview button, and the More actions menu (⋯).
- The status of the entry, such as Draft or Ready.
- Mark as ready with a menu arrow next to it. Owners see it. Editors see it disabled, with a short reason.
- A button that opens and closes the Details panel.
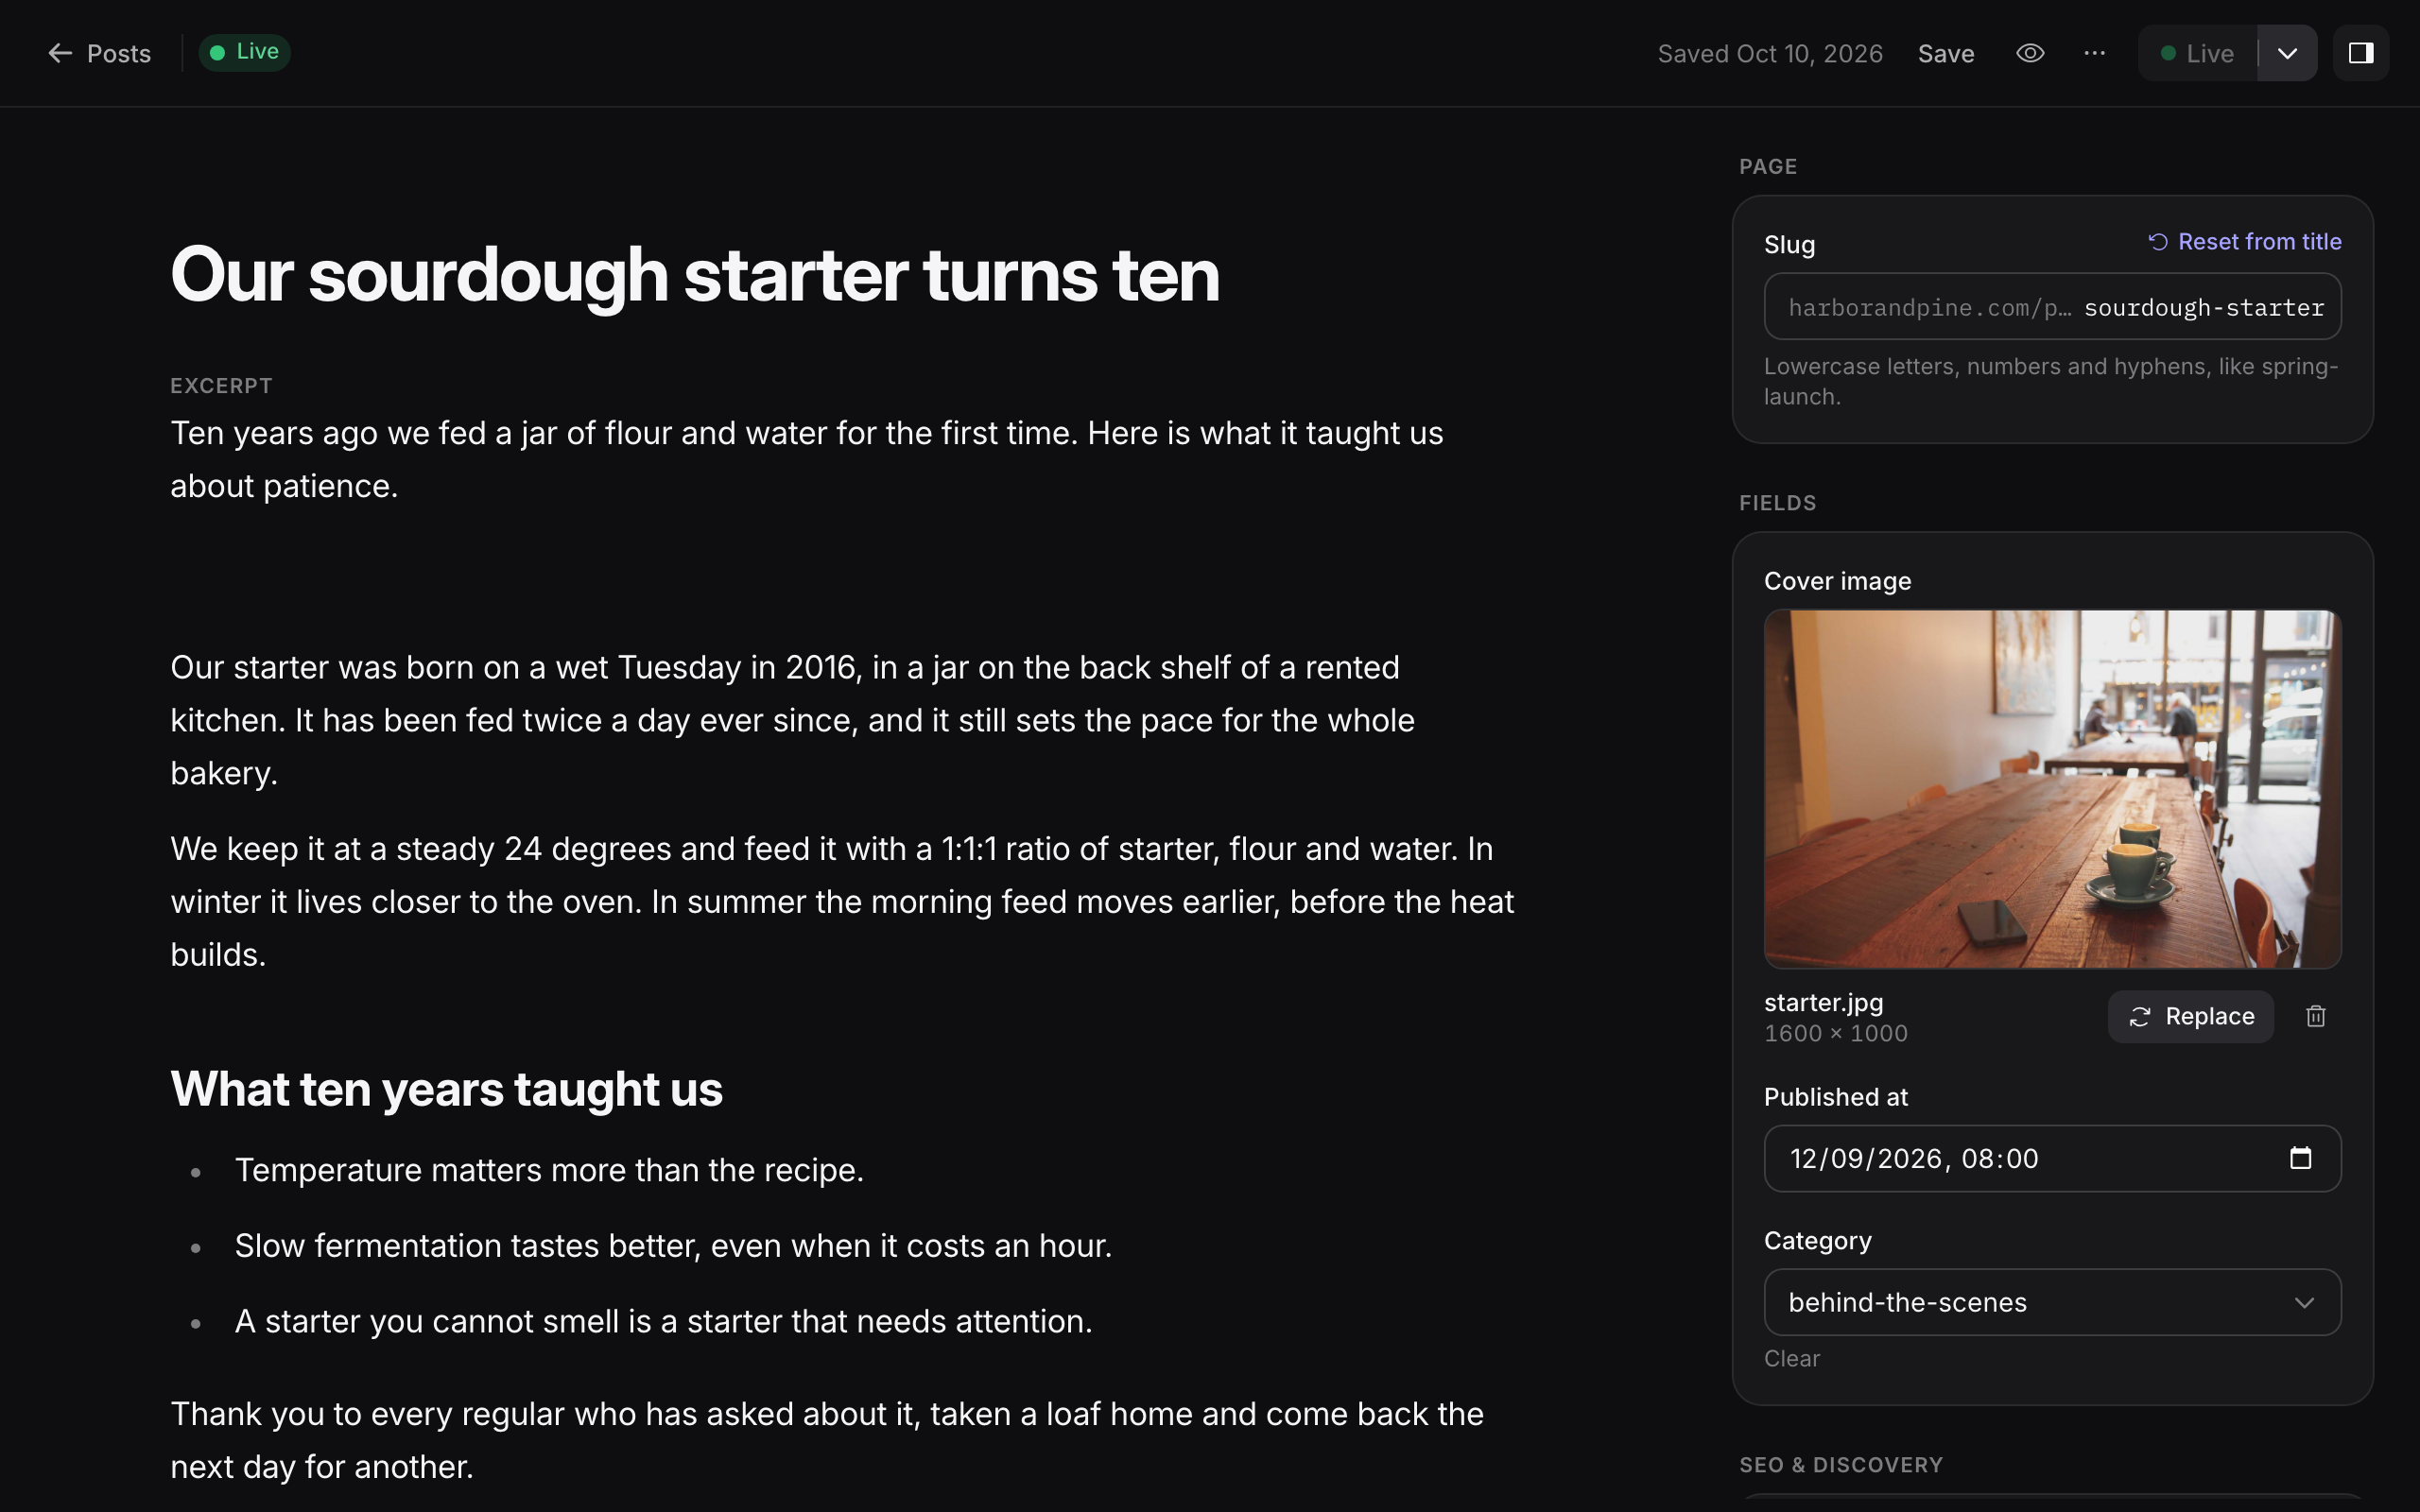
The title is the large field at the top. The other fields follow below it, in the order your agency set up. Each field shows its own label as a placeholder when it is empty.
Autosave
You do not need to press save to keep your work. The editor saves your changes 2 seconds after your last change. It also saves when you move to another tab or window.
The save status shows what is happening:
- Saving… while your changes are being sent.
- Saved or All changes saved when everything is stored.
- Couldn't save with a Retry button when the save fails. Fix any highlighted field, if there is one, and try again.
To save straight away, select Save or press ⌘S on a Mac or Ctrl+S elsewhere.
A new entry needs a title
An entry without a title has no address yet, so it is not saved. If you leave the page before you add a title, the text you wrote is lost. As soon as you type a title, the entry saves by itself.
If a save cannot reach the server, the editor keeps a copy of your work in this browser. When you open the entry again, it offers that copy so you can review it. Check it before you keep it, because the server may already hold a newer version.
If you try to leave with changes that were not saved, the editor asks Leave without saving your latest changes? Select Stay to go back and let the save finish.
Fields
The fields depend on the content type. Your agency decides which fields exist and which ones are required. These are the kinds of field you will meet:
| Field | What you do |
|---|---|
| Short text, long text | Type into the box. Long text takes several paragraphs. |
| Rich text | Write with formatting. See Rich text below. |
| Image | Select Choose an image, then pick a file from the Library or upload one. Use Replace image or Remove image to change it. |
| Date, date and time | Pick a date, or a date and a time. |
| Choice | Pick one option from a list. Use Clear to remove the choice. |
| Number | Type a number. |
| Yes / no | Turn the switch on or off. |
| Web address | Type a full web address. |
| Slug | Sets the address of the entry. See Slugs. |
| Link to entry | Select Select an entry… and pick an entry from the collection the field links to. Use Search entries… to find it. |
Fields that are required must be filled in before you can mark an entry as ready or schedule it. If something is missing or wrong, the editor shows Couldn't save — fix 1 field (or the number of fields) and highlights them.
A Link to entry field can point only to an entry that is already marked ready. If the entry you link to is still a draft, you cannot mark your entry ready. Mark the linked entry ready first.
Image descriptions
Every image should have a description (alt text), so that people using screen readers understand it. If an image has no description, the editor tells you: This image has no description yet. Add one in the Library so everyone can understand it. Descriptions are added in the Library. See Library.
Rich text
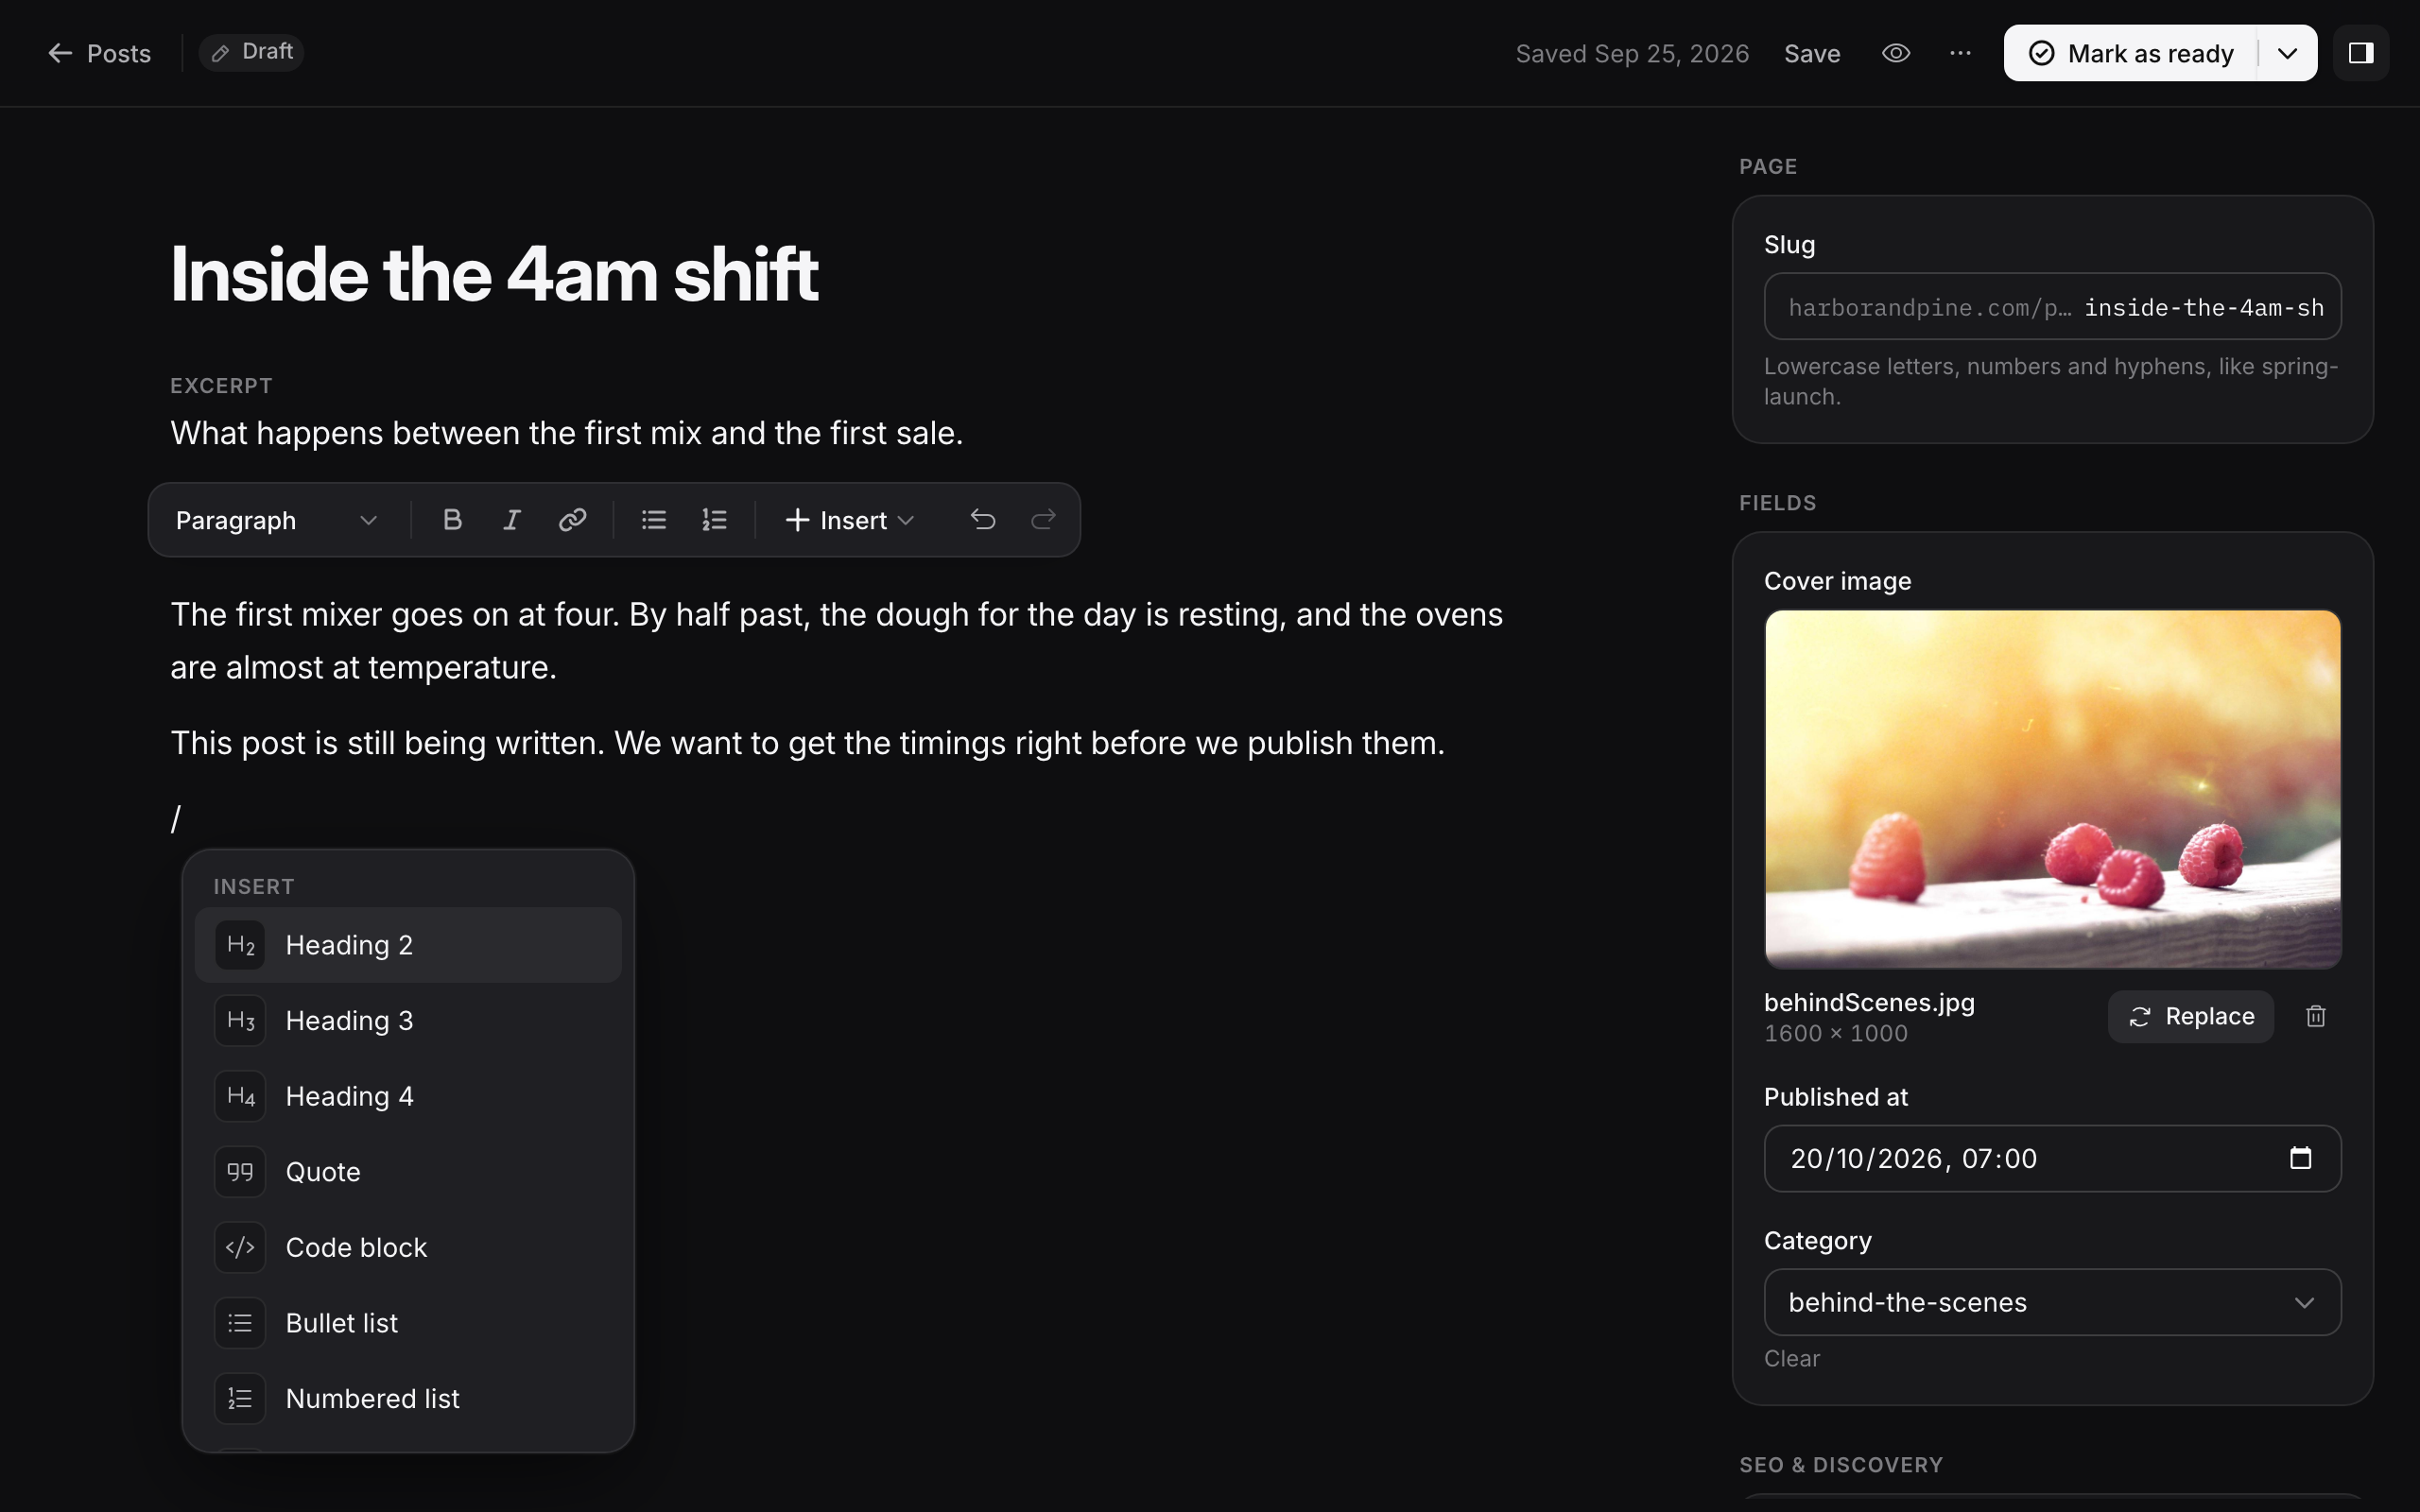
A rich text field has a formatting toolbar and a / menu.
- Formatting: Bold, Italic, Link, and the styles Paragraph, headings, Quote and Code block.
- Lists: Bullet list and Numbered list.
- Insert: Image, Table and Divider. Table tools let you add or delete rows and columns, or the whole table.
- Undo and Redo.
To start a block, type / on an empty line and choose from the menu. Links must start with http://, https:// or mailto:. Links open in a new tab on the live site.
Images pasted from another website are copied into the Library when the entry saves, and the text then uses the Library copy. That way the live site only serves files from your Library, and the website can bundle them with areca pull. The same address is copied once, so pasting it again reuses the file. If a copy fails, for example because the other site refuses the download or the file is not a JPEG, PNG, WebP, GIF or PDF, the image keeps its original address and the editor shows a warning. The copy is tried again when you mark the entry ready.
Use the Preview formatting option in the More actions menu to see how the text will look on the website.
Details
The Details panel holds everything around the main content. Open it with the Details button in the top bar, or press ⌘. on a Mac or Ctrl+. elsewhere. The panel is one scrollable page with these sections:
- Page shows the address of the entry and its slug.
- Fields shows the structured fields, such as dates, choices, images and links.
- SEO & discovery holds the search and social settings. See SEO and AI suggestions.
- Status shows the current status, any schedule, dates, the author and the entry ID.
- History lists earlier saves and changes. See History and activity.
Slugs
The slug is the last part of the entry's web address, for example spring-launch in /blog/spring-launch. The editor creates it from the title, and it keeps updating until you change it yourself.
- Use only lowercase letters, numbers and hyphens, such as
spring-launch. - Each slug must be unique within its content type. If another entry already uses it, the editor shows Slug already exists.
- After you edit the slug by hand, Reset from title appears. Select it to go back to the title-based slug.
Changing the slug changes the entry's address on the website after the next Go live, so check the new address before you mark the entry ready.
Delete an entry
Only owners and agency admins can delete entries. Open the More actions menu (⋯) and select Delete…. You can also select several entries in the list, choose Select, and then delete them together.
Deleting cannot be undone. The confirmation dialog says so.
- For one entry, the dialog asks Delete this entry? and explains that the entry and all of its revisions are removed.
- If other entries link to this one, the dialog also lists them under Referenced by. Deleting still goes ahead if you confirm, but those entries would still point to a deleted entry. Update them first.
- For several entries, the dialog asks Delete 3 entries? (with the number you selected).
If you are not sure whether you need an entry again, archive it instead.
Archive an entry
Archiving takes an entry off the website without deleting it. Only owners and agency admins can archive. Open the More actions menu (⋯) and select Archive. The editor confirms with Entry archived.
An archived entry stays in the CMS, and you can find it with the Archived filter. It is left off the website the next time the site goes live. See Drafts, ready and live.